

How to Add Captions to Reels on Mac, Automatically
Add captions to Reels on Mac: what Final Cut, iMovie, CapCut and Descript offer, then a step-by-step in BetterEdits from one keystroke to burned-in bars.
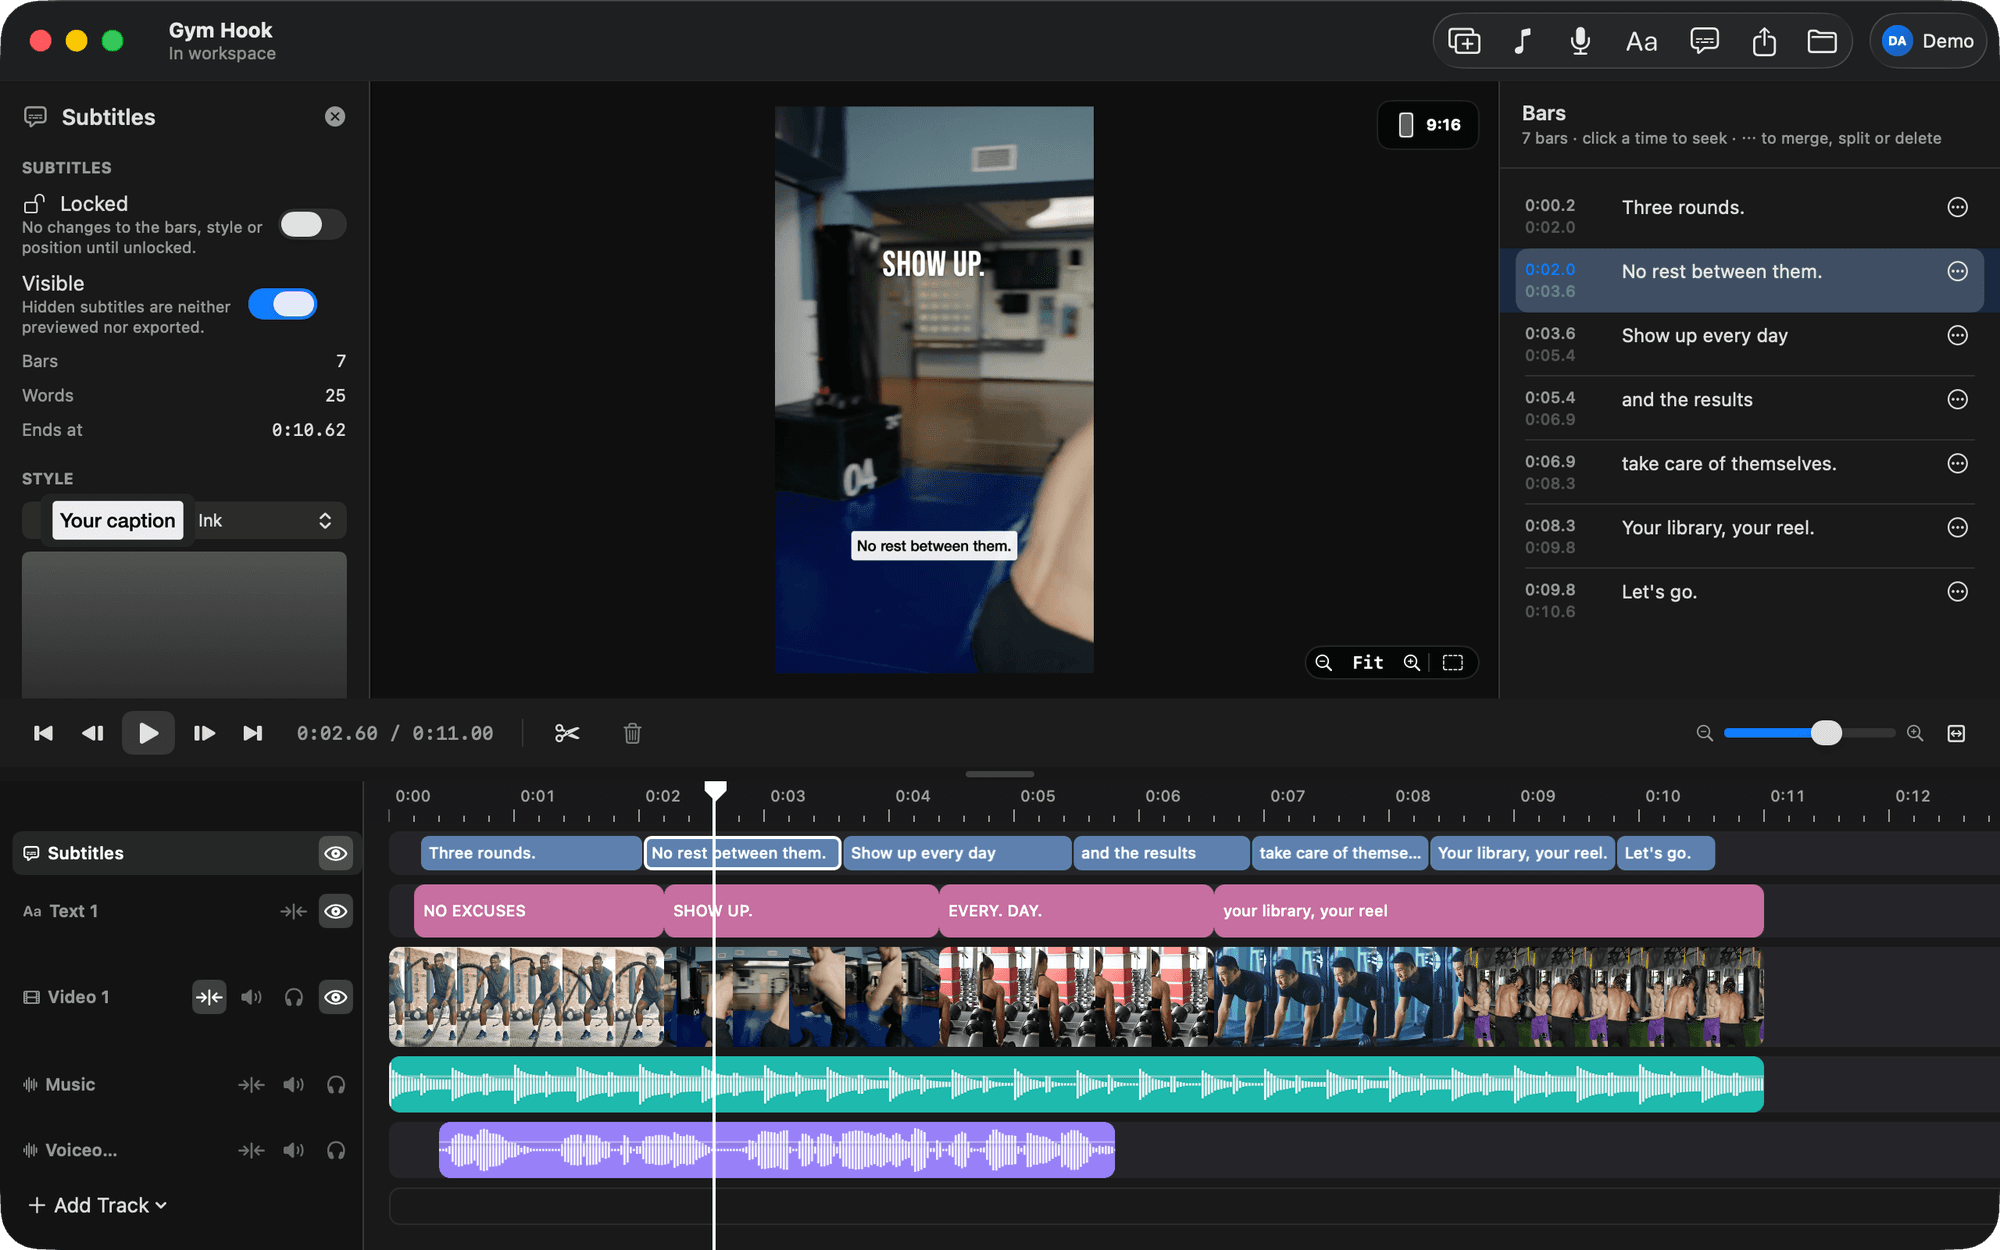
The fastest way to add captions to Reels on Mac is an editor that transcribes the timeline for you and burns the words in when you export. Final Cut Pro 11 can do it, CapCut for Mac and Descript can do it, and BetterEdits does it in one keystroke (⌥⌘T) with a live 9:16 preview and guides that show where Instagram's own interface will sit on top of your video. Below: the options side by side, the full walkthrough in BetterEdits, and the two decisions that determine whether captions get read.
How to add captions to Reels on Mac
- Open the reel in an editor that transcribes audio automatically.
- Generate captions from the audio track and fix names by hand.
- Split any bar longer than about six words.
- Pick a high-contrast style and keep it above the bottom fifth of the frame, where Instagram's labels sit.
- Export with the captions burned in.
"Burned in" is the part that matters for Reels. Instagram will generate its own captions from your audio if you let it, but they look like everyone else's, viewers can switch them off, and you can't fix a misheard name. Captions rendered into the video are the ones people actually see.
Auto captions on Mac: the options
| Auto transcription | Edit the words | Styling | Knows the Reels layout | Notes | |
|---|---|---|---|---|---|
| Final Cut Pro | Yes, since version 11 | In the caption editor | Limited to the caption format's options | Title-safe overlay, not Instagram's layout | Full NLE; captions are a track you can also export as a sidecar file |
| iMovie | No | Titles typed by hand | Title styles | No | Free, fine for one or two lines |
| CapCut for Mac | Yes | In the caption panel | Templates and presets | Built for vertical | Desktop version of the phone app; projects live inside CapCut |
| Descript | Yes | Edit the transcript, the video follows | Caption templates | Not specifically | Transcript-first; strongest when the piece is mostly talking |
| BetterEdits | Yes, one click, ⌥⌘T | Inline on the bars | Eight presets, full style editor, live 9:16 preview | Reels, Stories, feed and grid guides | Single timeline, macOS 15, version 0.1 |
Final Cut is the right call if the reel is a cut-down of a longer piece you're already building there; exporting vertical video from Final Cut covers the project settings. CapCut is the right call if you want the phone app's templates on a bigger screen (the trade-offs are in CapCut alternatives for Mac). Descript is the right call for a talking head you'll cut by deleting sentences. BetterEdits is for the case where the reel is the whole job: a few clips, captions, maybe a voiceover, out the door at 9:16.
Where Instagram covers your captions
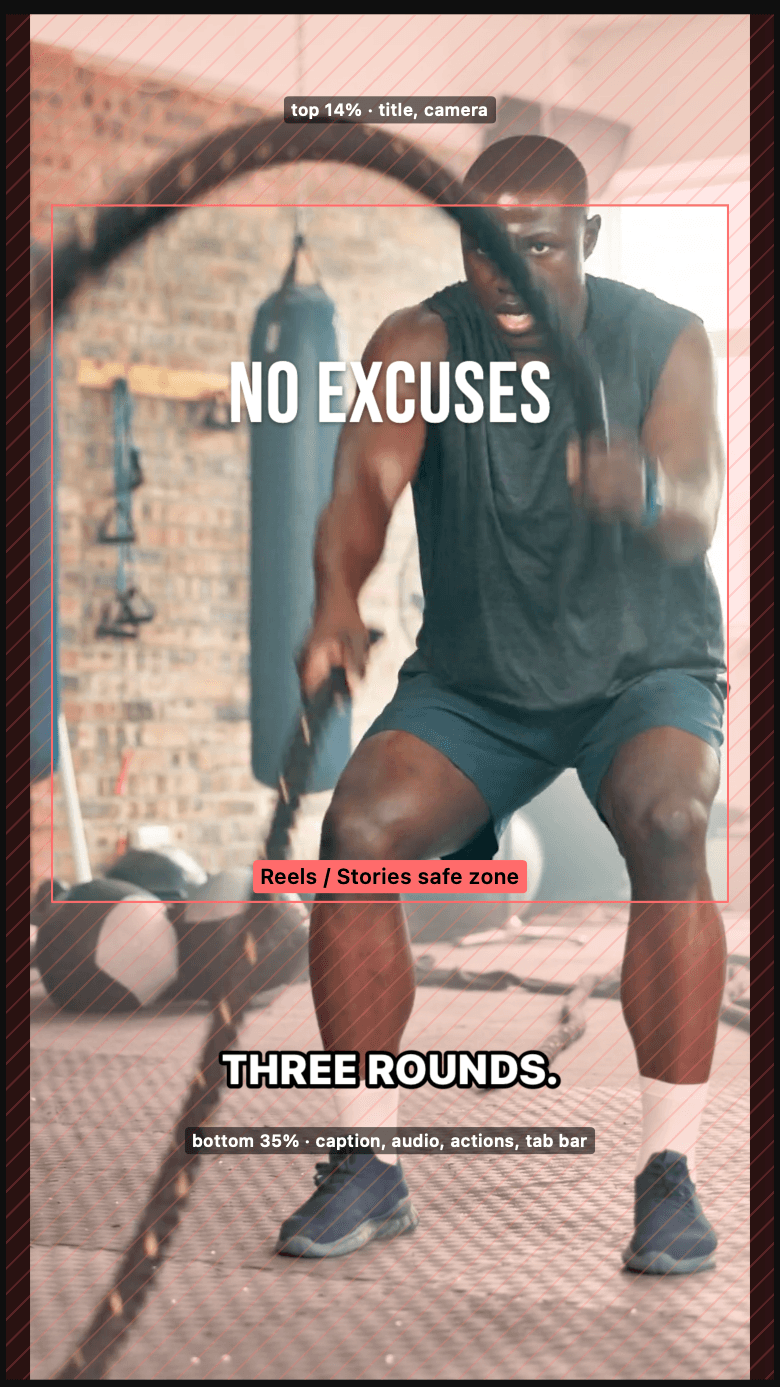
Open any reel and look at what's drawn over it. The bottom of the frame carries the account name, the caption text and the audio label, and that block grows when the caption is long. The right edge carries a column of buttons: like, comment, share, save and more. The top strip holds the Reels header. None of that is part of your video, and all of it sits on top of it.
Then there are the crops. In the home feed, a reel is shown at a squarer ratio than 9:16, so the top and bottom of the frame are gone. On your profile grid, the tile is another crop again. A caption bar you placed at the very bottom is hidden under the audio label in the player and simply absent in the feed.
The practical rule: keep captions in the middle band of the frame, from roughly a third of the way down to roughly a fifth up from the bottom, and keep them off the right edge. BetterEdits draws that for you. The Guides menu on the viewer shades the Reels and Stories UI, the feed crop and the profile grid crop, so you see a bar drifting under the caption box before you export, not after you post.
Step by step: auto captions in BetterEdits
You need a project with the reel on the timeline. That's ⌘N for a new project, then drag the clips from Finder (or from BetterLibrary) onto the timeline; they land packed and snapped. Everything below happens after the cut is roughly right, because captions follow the audio, and a trim after captioning means regenerating or re-splitting.
1. Press ⌥⌘T and pick the track
⌥⌘T (or Generate Subtitles in a track's panel) asks which track to transcribe. Pick the one with the voice. If the voice is on the video clips, that's the video track; if you recorded a voiceover with ⌘R, that's the voiceover's audio track. The music track is the wrong answer, and the app won't stop you.
2. The audio is transcribed
BetterEdits mixes the track down and sends the audio to our transcription service. The language lives in Settings > Transcription. What leaves your Mac is that track's audio and nothing else. The transcript is cached against the track's content, so restyling and re-splitting later cost nothing and send nothing.
Captions spend AI credits that come with your plan, and every plan starts with a free trial.
3. Read the bars and fix them inline
A Subtitles track appears on top of the timeline, made of short bars. Click a bar's time to seek there. Click the words to change them. Merge two bars that were split mid-thought, split one that runs long, delete the "um", retype the misheard word. This is the step people skip and shouldn't: a transcription is a draft, and one wrong name in a burned-in caption is permanent.
4. Put names in Keywords
If the transcription hears "Ana Ruiz" as "Anna Reese" every week, don't fix it every week. Settings > Transcription has a Keywords list; anything you add there is boosted, so the model prefers those spellings. Add the client's name, the product, the exercise names, your own name. Regenerate once and check.
5. Set bar rules and re-split
The same settings hold the bar rules: max words per bar, max seconds per bar, and whether to break on punctuation. For Reels I'd start at four or five words and about two seconds, with punctuation breaks on. Change the rules and use Re-split from the track panel; it re-cuts the bars from the cached transcript, so there's no new transcription and no new credit spent.
6. Pick a style
The track panel's style menu previews each style in its own look. Eight presets ship: Soft Pill, Airy Caps, Editorial, Ink, Mono, Bold Outline, Yellow Pop and Outlined Serif. Settings > Subtitle Styles is the editor: font, size, colours, background, outline, shadow, uppercase and word highlight, all shown in a live 9:16 preview, so you're judging the style on a phone-shaped frame rather than a desktop one.
7. Position with the guides on
Position is per track: Top, Middle or Bottom, plus an inset to nudge it. Turn the Reels guides on in the viewer and drop the bars where the shading isn't. For most reels that's Bottom with a generous inset, or Middle when the subject's face sits high in the frame.
8. Export
⌘E opens the export sheet: HD, 2K or 4K; 24, 30 or 60 fps; Normal or HDR (HDR is offered only when the footage is HDR). Visible subtitle bars are burned in with the same renderer the viewer uses, so what you saw is what ships. A hidden track (the eye icon) is left out, which is how you export a version without captions from the same project. Lock the subtitles track once the bars are right so a later trim can't knock them out of line.
The export is an MP4 in the project's exports/ folder. BetterEdits doesn't post to Instagram; you upload the file yourself.
Making captions readable
Two decisions matter more than the font.
Bar length. A viewer reads a caption in the time the words are spoken, on a phone, often with the sound off. Four words in two seconds is comfortable. Twelve words in five seconds is a wall. Keep the max-words rule low and let the bars come faster; if a sentence has a natural pause, break there, which is what the punctuation rule does.
Contrast. Footage moves. A caption that's readable over a dark gym wall disappears over a white sky two seconds later. A background box (Soft Pill, Yellow Pop) or a thick outline (Bold Outline) survives any background. Plain text with a soft shadow only works over consistent, dark footage.
The rest is taste, with a couple of cautions. Uppercase reads as shouting and slows reading when every bar is capitals; use it for a hook line, or pick Airy Caps for a reel that's meant to feel loud, but don't set uppercase on a two-minute talking head. Word highlight (the karaoke-style emphasis) is good on spoken hooks and tiring across a whole voiceover. And pick one style for a series and keep it, because the caption look is part of what makes a series recognisable on the grid.
Before you pick BetterEdits
It needs macOS 15 or later. It has one timeline and four track kinds, and no transitions, effects, keyframes, speed changes or colour grading; if the reel needs any of those, it's a Final Cut job. Export is MP4 (H.264, or 10-bit HEVC for HDR) and M4A. It's version 0.1 and new. What it does have is the caption loop above, a voiceover that ducks the music, text in 17 Edits-style looks and HDR that stays HDR from the iPhone to the export. Instagram's Edits app on Mac explains where it sits next to Instagram's own editor, and the best vertical video editor for Mac compares the field.
What to do next
Take the last reel you posted, open it in BetterEdits, press ⌥⌘T, and turn the Reels guides on. If any bar sits in the shaded area, that's the caption your viewers didn't see. Download BetterEdits to try it; plans and the trial are on the pricing page.
Questions people ask
- Can Final Cut Pro add captions automatically?
- Yes. Final Cut Pro 11 added transcription of the timeline's dialogue into a captions track. Styling is limited to what the caption format allows, and there are no Instagram-specific safe-zone guides, so check the placement against the Reels interface yourself.
- Does iMovie have auto captions?
- No. iMovie on the Mac has title styles you type by hand, which is fine for one or two lines but not for captioning a whole reel.
- Where should captions go on an Instagram Reel?
- In the middle band of the frame, in bars of about four to six words. Instagram's account name, caption and audio label cover the bottom of the frame and the button column covers the right edge, and the feed and profile grid crop the top and bottom again.
- How do I stop auto captions from misspelling names?
- Add the names to the transcription keywords list before generating. In BetterEdits that's Settings > Transcription > Keywords; the transcription then prefers those spellings. Fix any leftovers inline on the bars before you export.
- Are captions burned into the video in BetterEdits?
- Yes. Visible subtitle bars are rendered into the export with the same renderer the viewer uses. Hide the subtitles track to export a version without them from the same project.
Keep reading
- BetterEditsBest Vertical Video Editor for Mac (7 Options Compared)The best vertical video editor for Mac depends on how much editor you want. Seven options for 9:16 reels, compared on captions, HDR and learning curve.
- BetterEditsCapCut Alternative for Mac, 6 Editors That Use Real FilesSix CapCut alternatives for Mac, ranked for short vertical video: what each does better, what it lacks, and what you give up when you leave CapCut behind.
- BetterEditsIs There an Edits App for Mac? Instagram Edits on macOSNo Edits app for Mac exists; Instagram Edits is iOS and Android only. The Edits workflow and how to get it on a Mac: one timeline, one-click captions.