Voiceover that ducks the music.
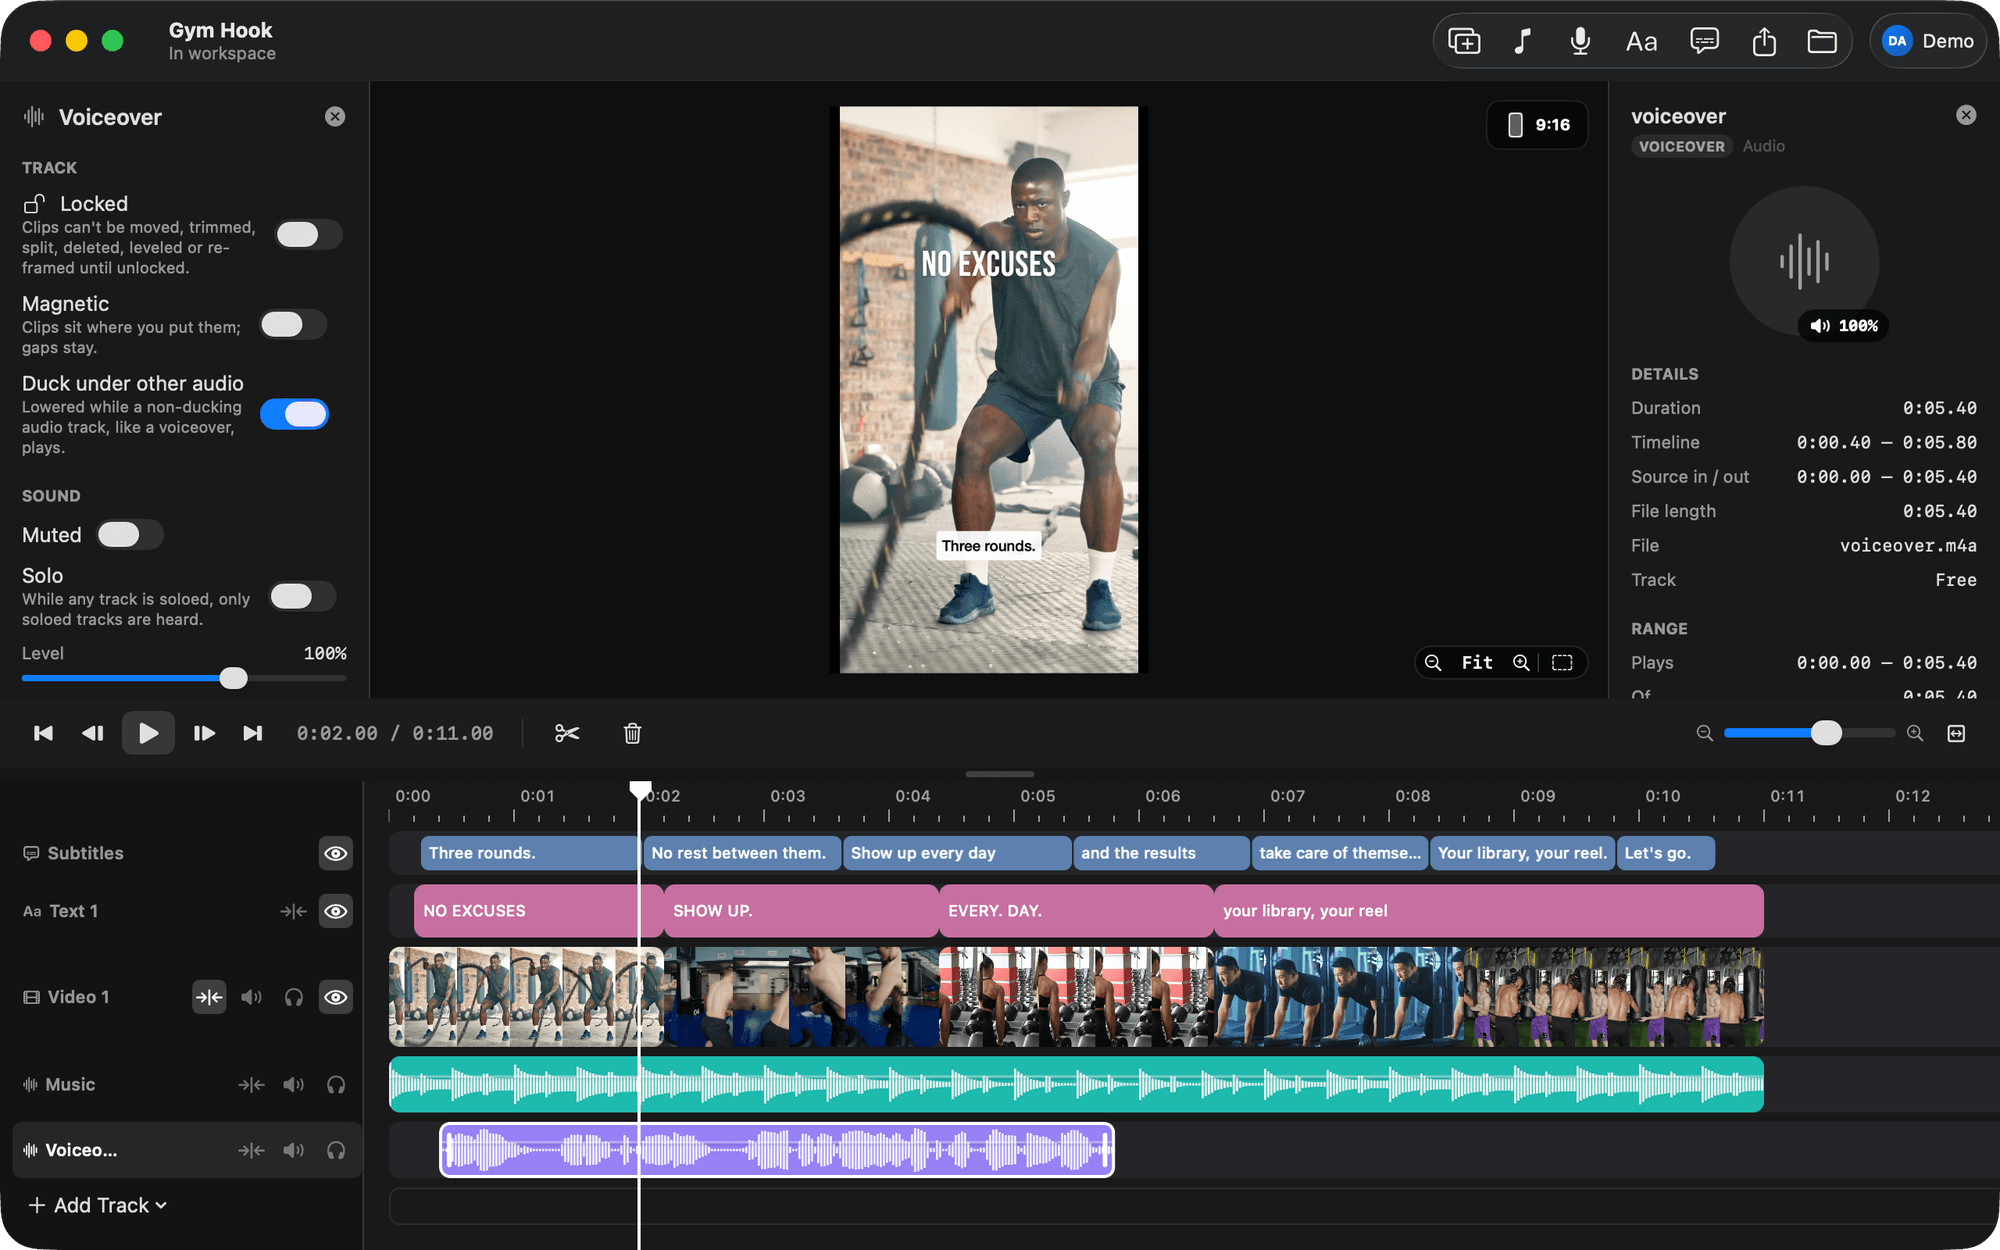
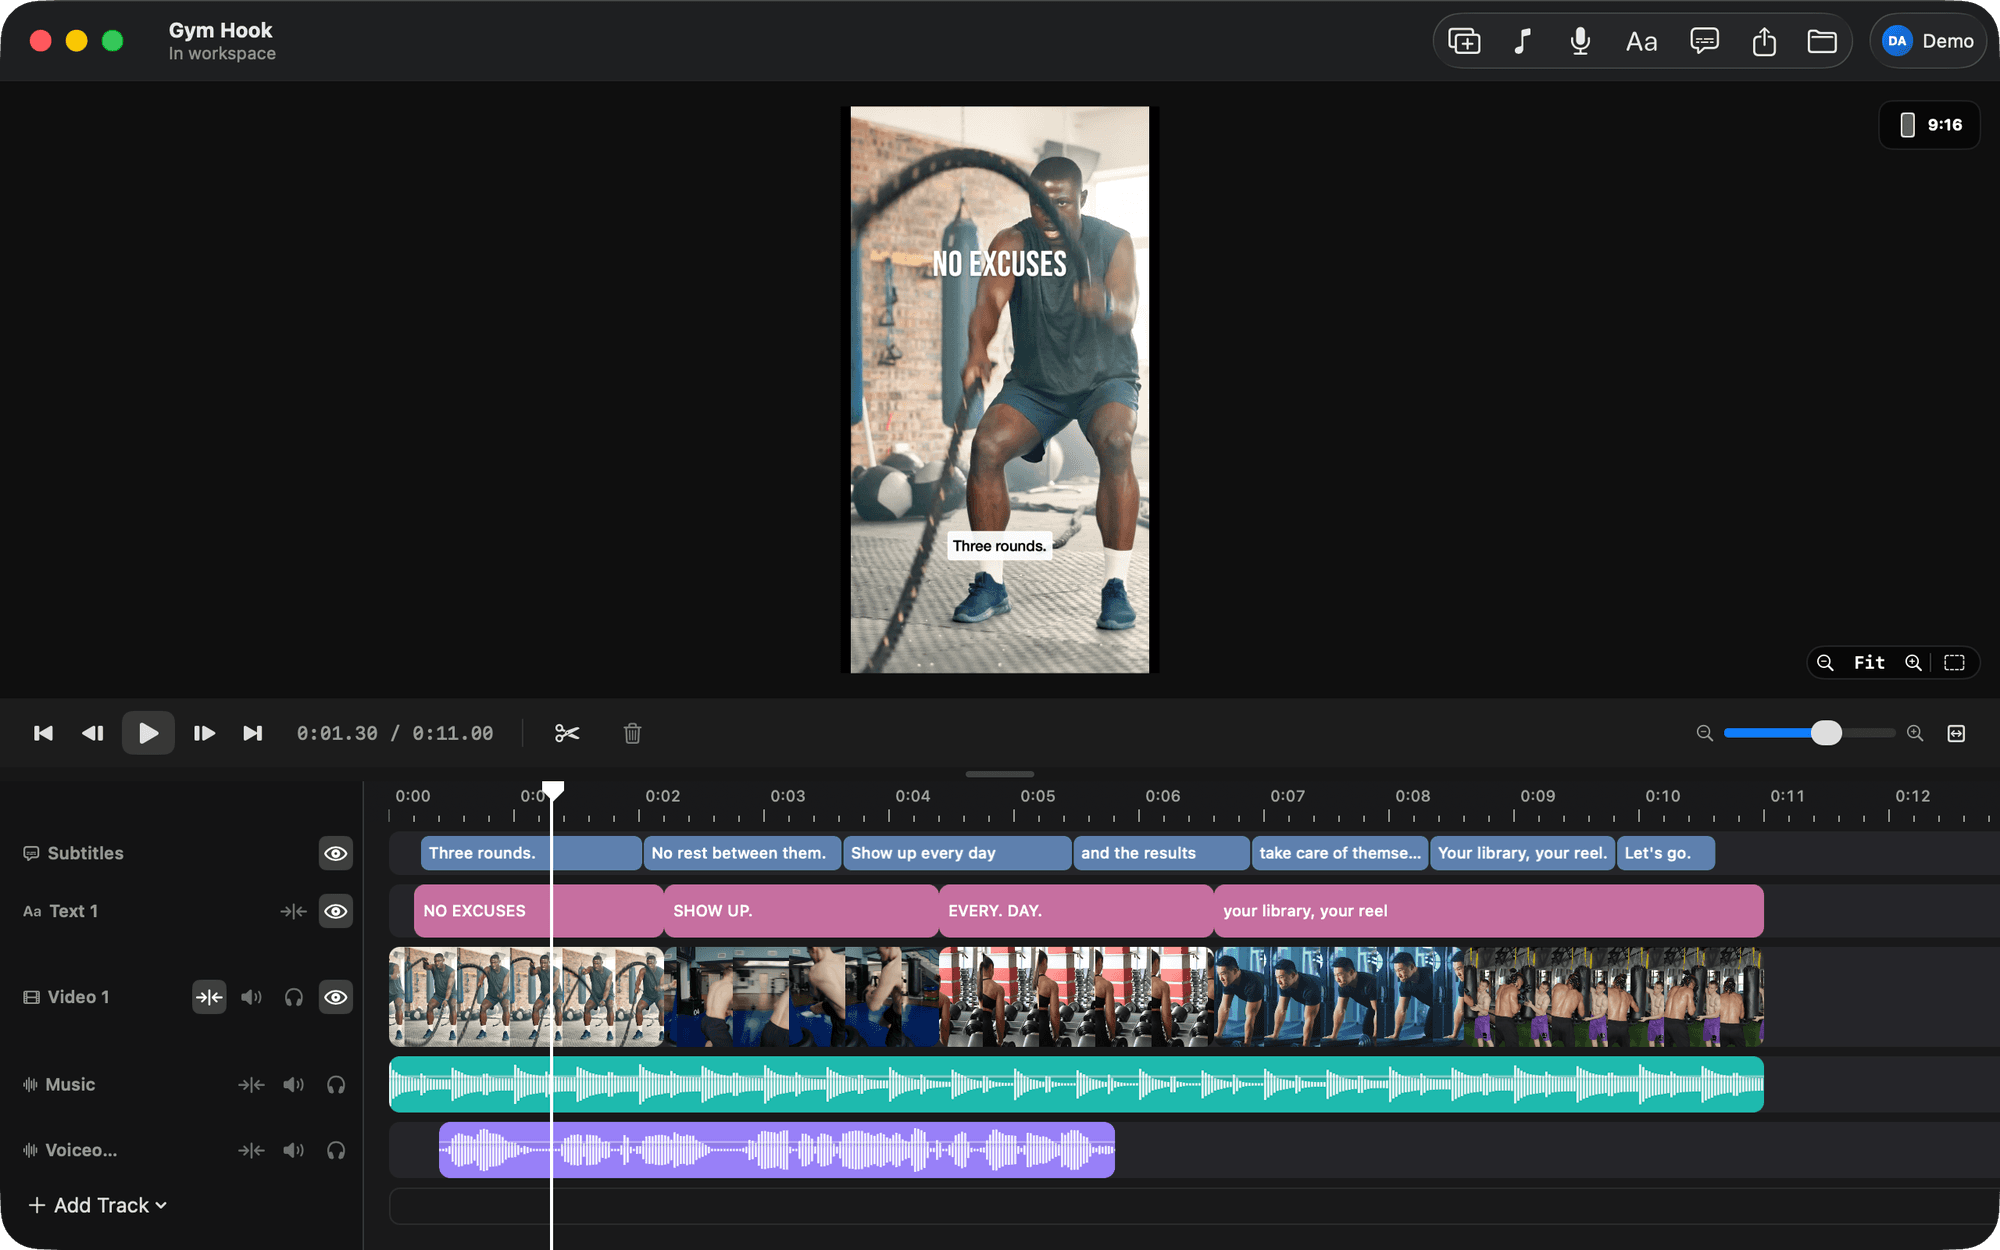
⌘R records from the playhead while the timeline plays, after a 3-2-1 count, drawing the take live. Music on the other tracks drops under the voice on its own.

One timeline, captions in one click, and reels you can clone into templates. Nothing you do not need. Takes clips from BetterLibrary and orders from Claude Code.
Free to download. macOS 15 or later, Apple silicon. No account needed to edit.
A 30-second video should take minutes. Instead it takes a phone editor that hides your files and loses your trims, or a full editor that wants a project, an event, a library and a colour page first.
Fat-finger trims on a five-inch screen. No file system, so the footage lives inside one app. One project at a time, and the export is trapped in the app that made it.
Final Cut, Premiere and Resolve are built for feature films and teams. For a short video, the setup tax is the whole job, and you learn a hundred panels to use four.
A format that works becomes a project you can fill with your own footage.
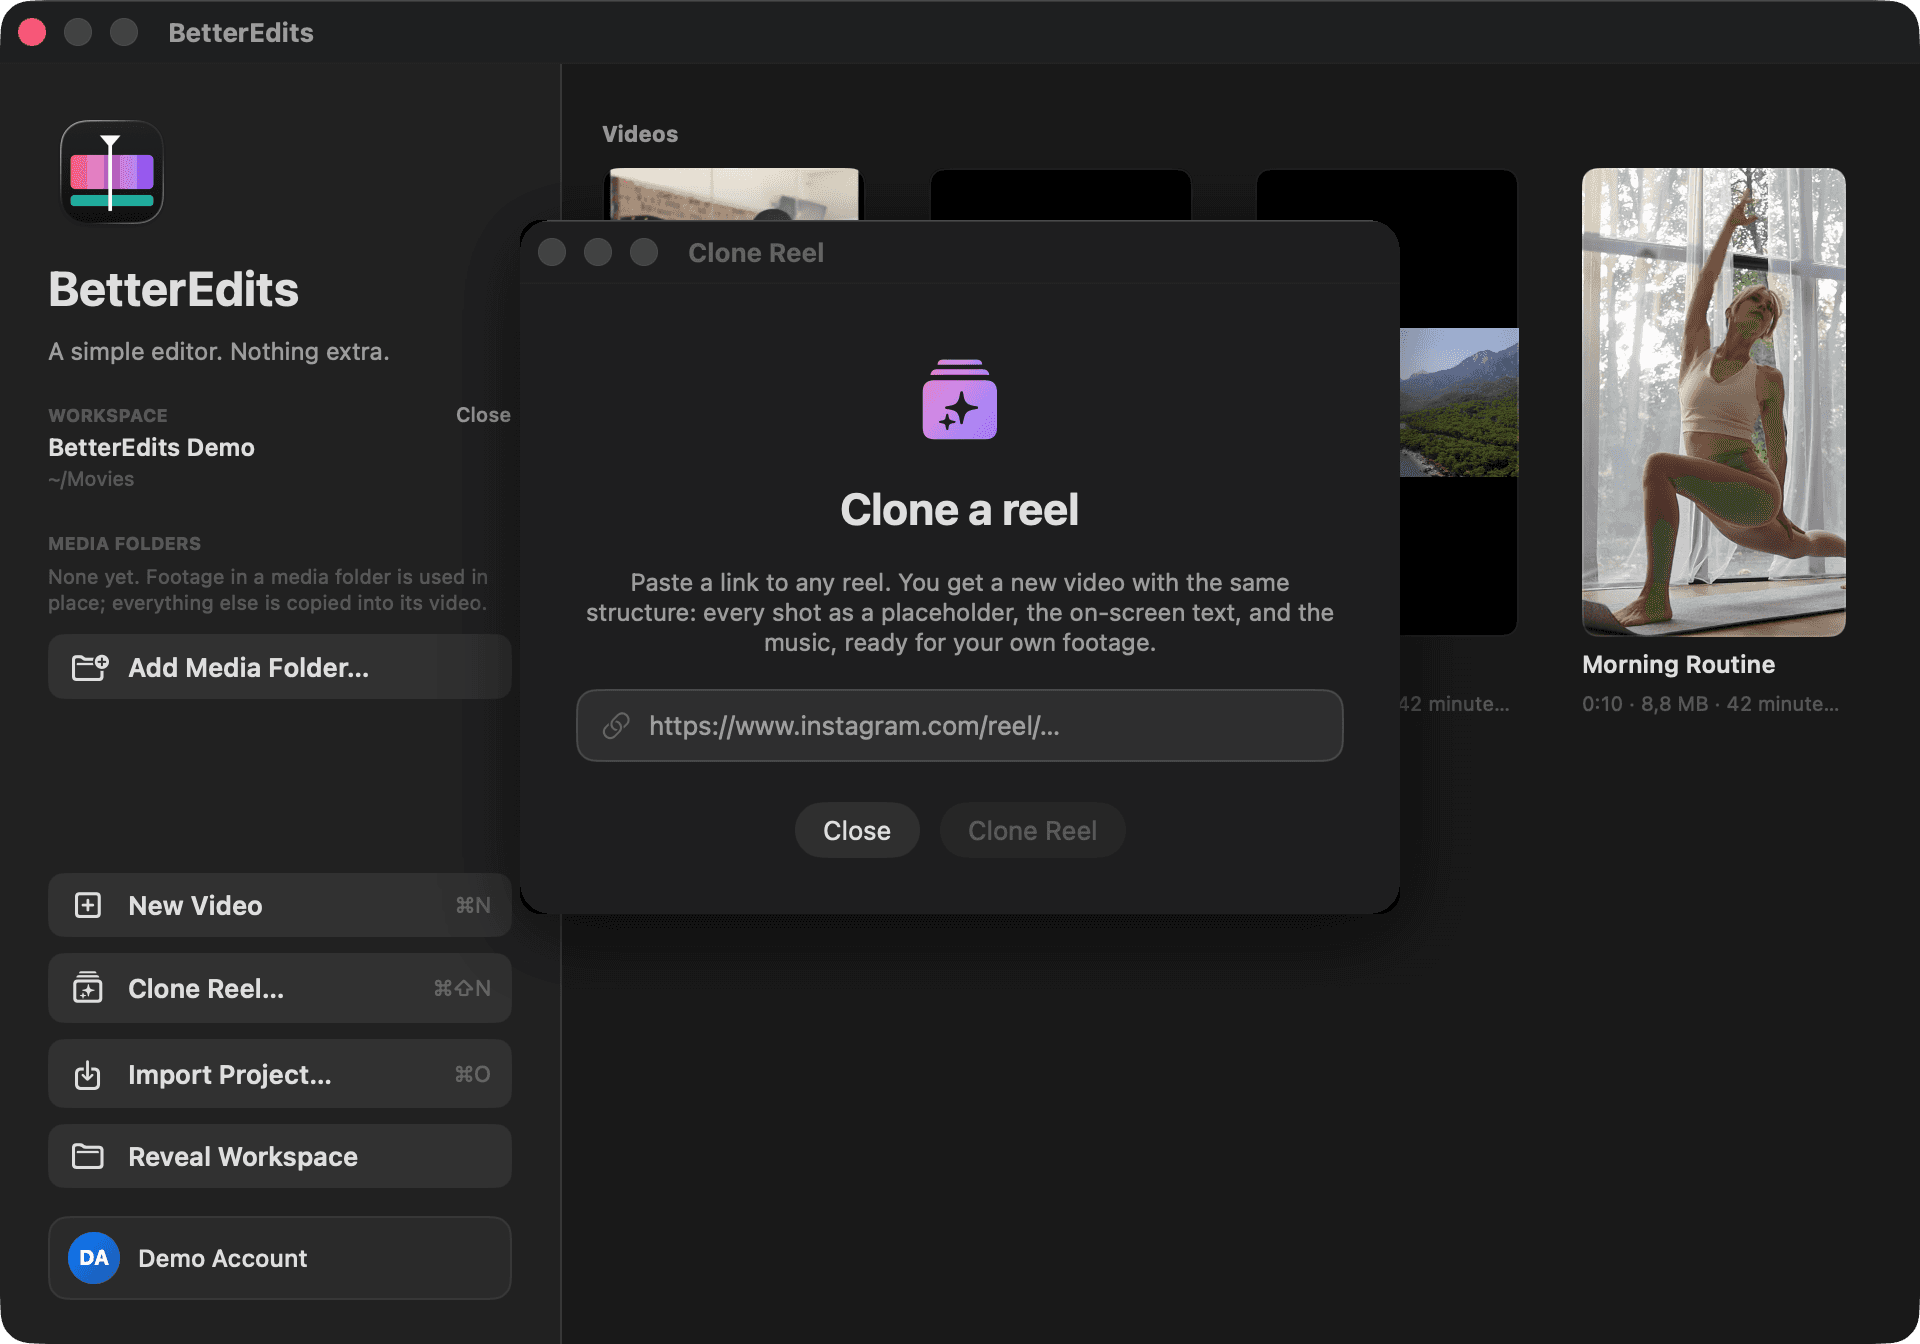
⇧⌘N takes a public reel from Instagram, TikTok or YouTube Shorts and builds a project with its structure: named placeholders like “Talking head: hook line”, music and voiceover slots, and texts in a matching look. The original rides on a Reference track at 50% so you can match it shot for shot.
Block out the video before you have the footage. Fill it when you do. Keep it for the next one.
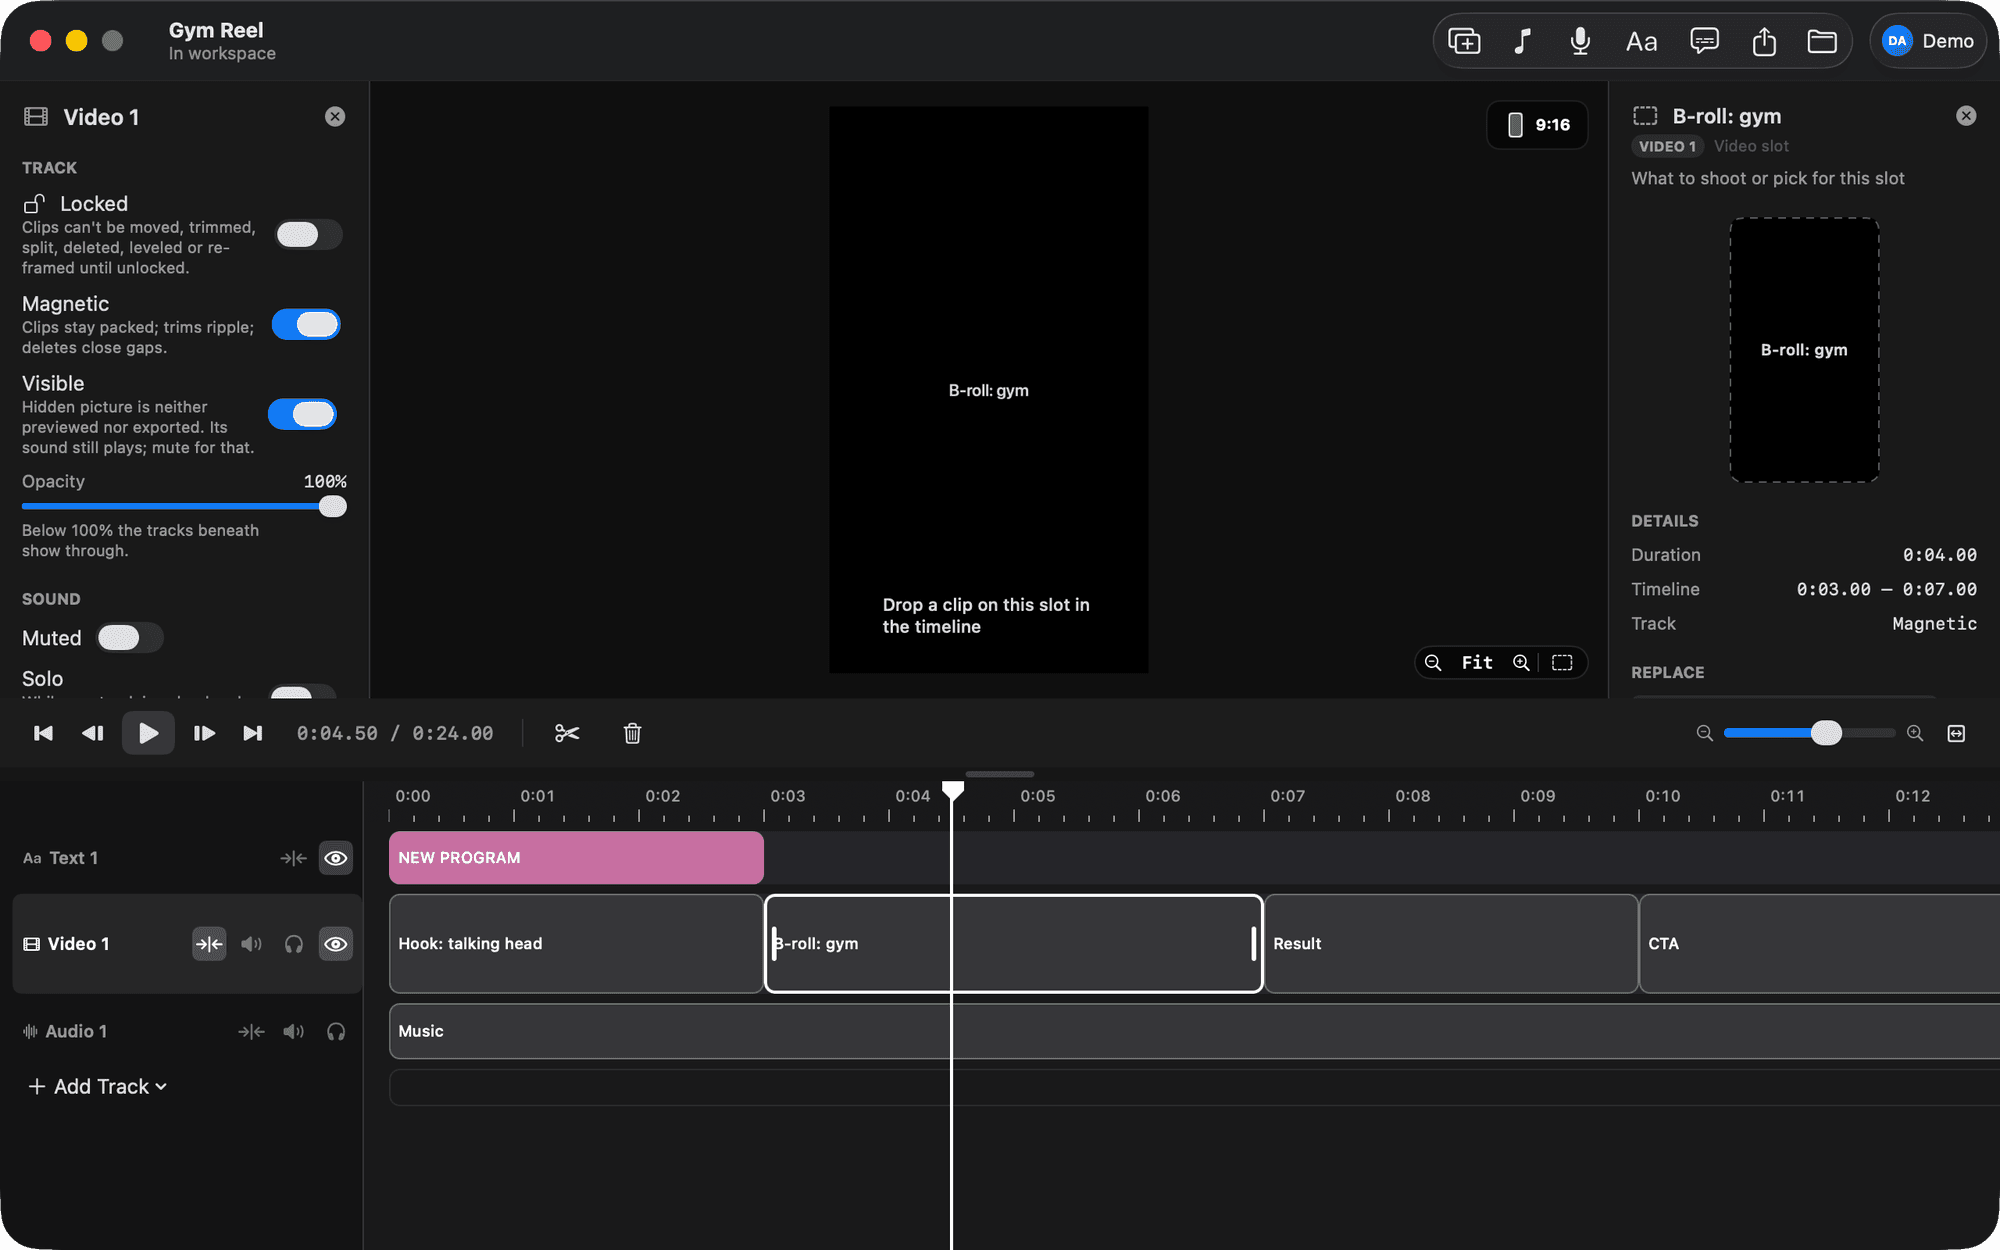
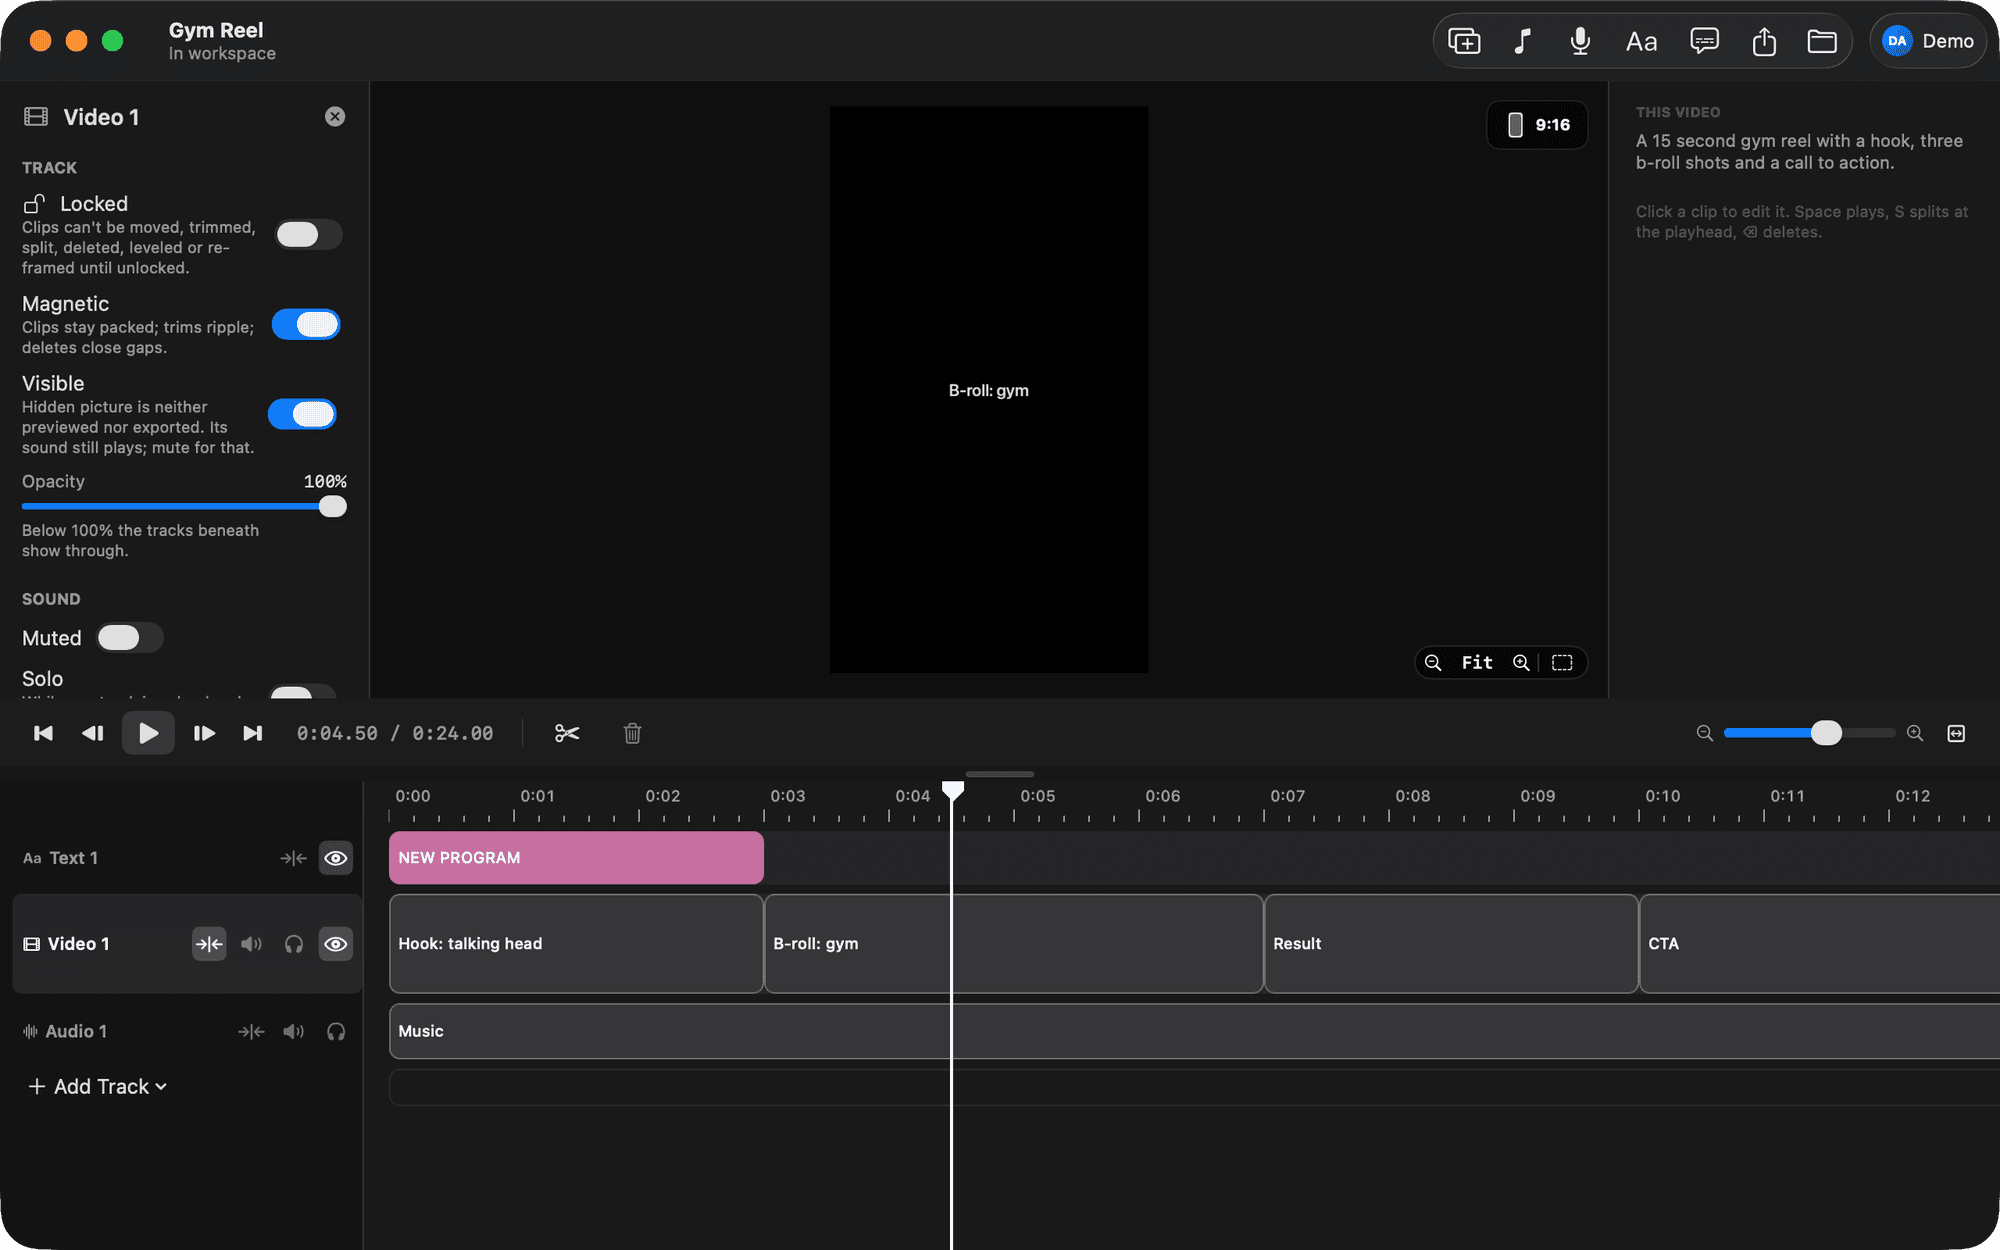
⇧⌘P puts a black plate on the track with a name and a length: “Hook: talking head”, “B-roll: gym”, “Result”, “CTA”. Drop a file on it and the placeholder becomes the clip, trimmed to fit or filling the slot. Silence slots do the same for audio.
Every project can be printed as a template: plain JSON with the tracks, placeholders, texts and music slots, none of the media. Import it into a new project and the slots are waiting. One per series means the same rhythm every episode.
Right, styled like Edits, and burned in where the app will not cover them.
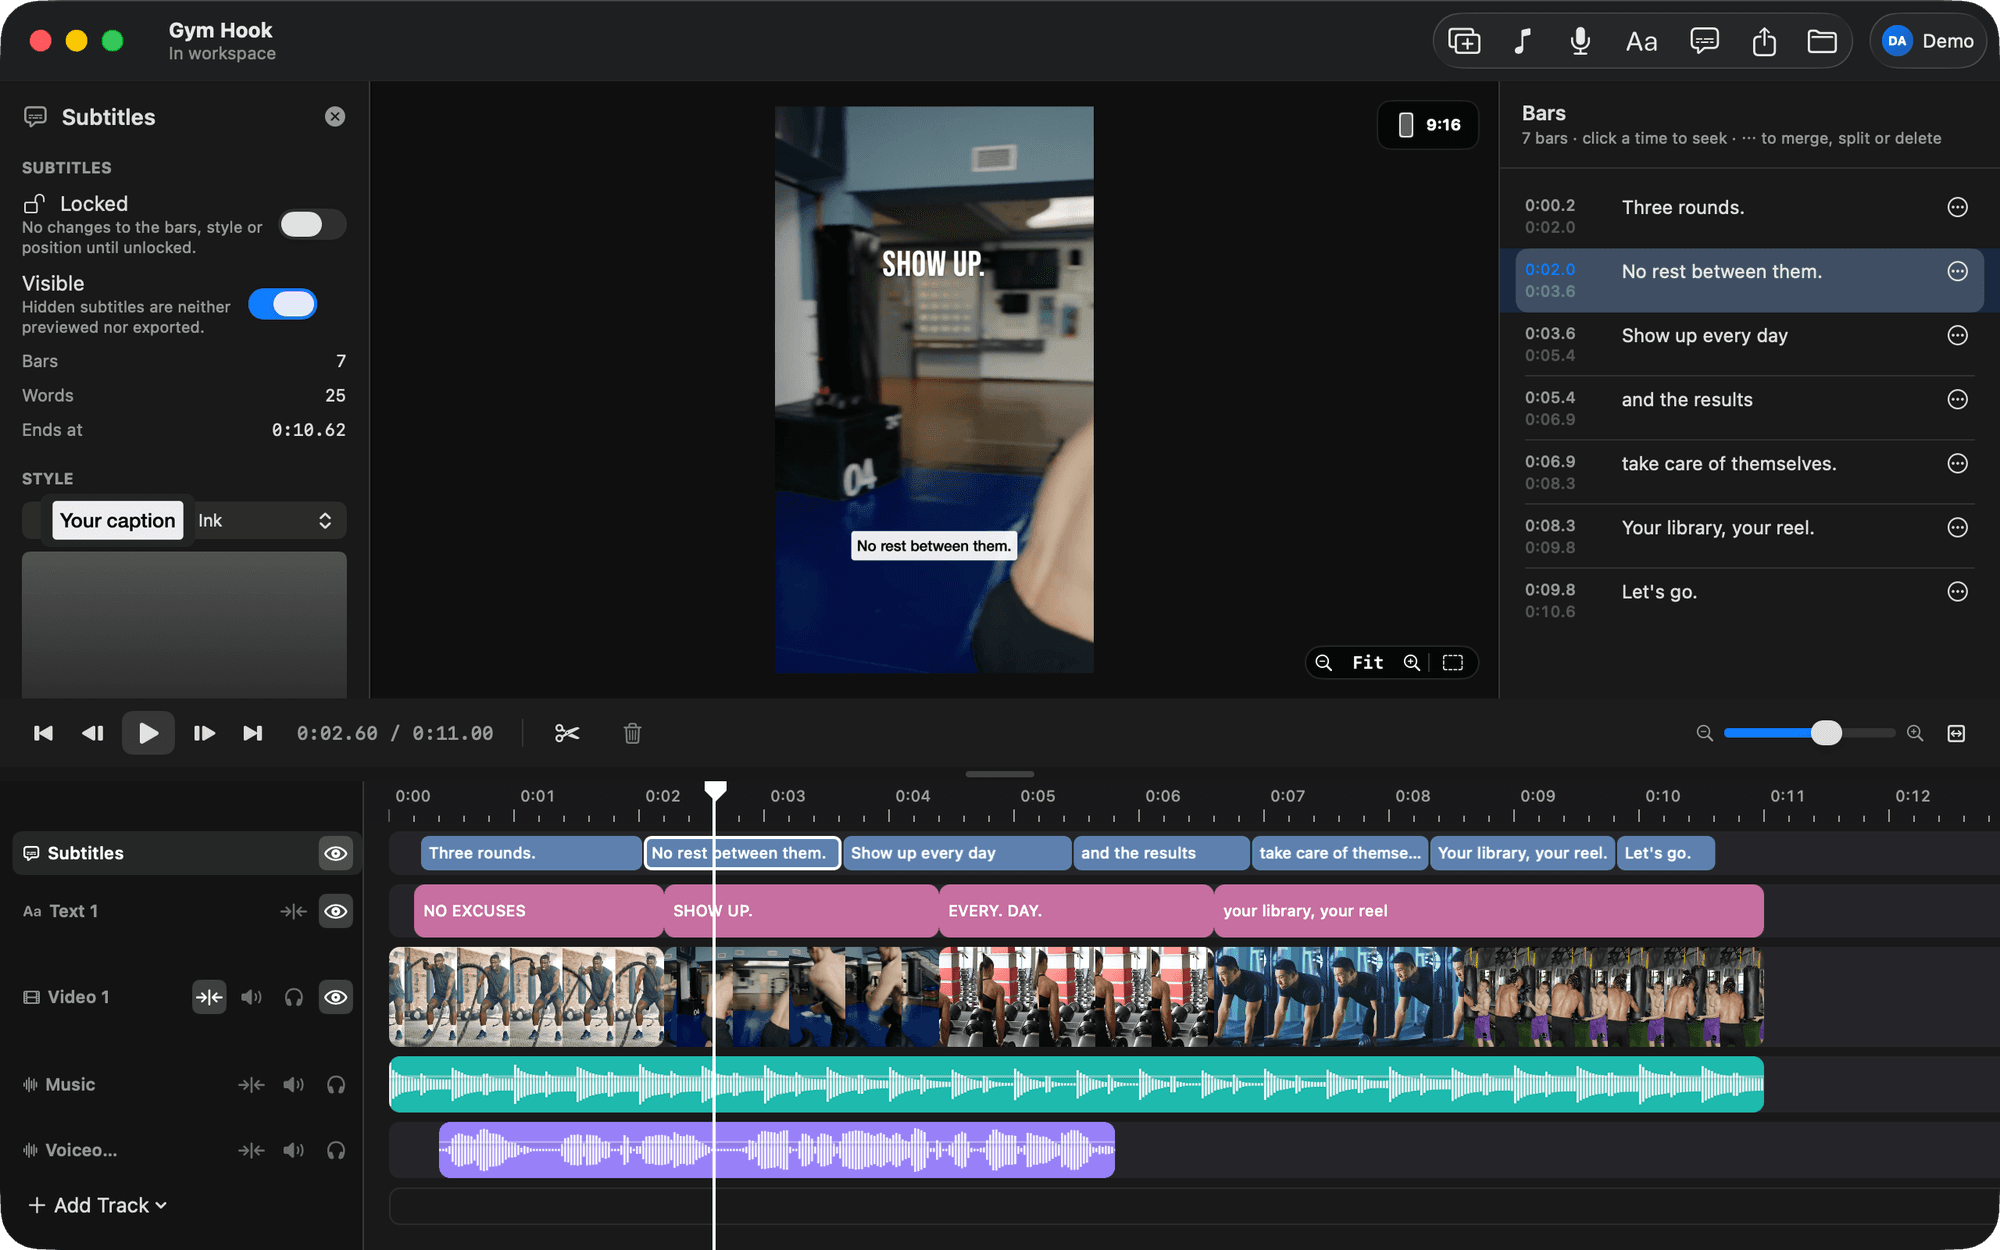
The track's sound is transcribed and comes back as short bars on a Subtitles track. Fix a word inline, click a time to seek, merge or split a bar. Names and jargon go in the keywords list so they come out spelled right.
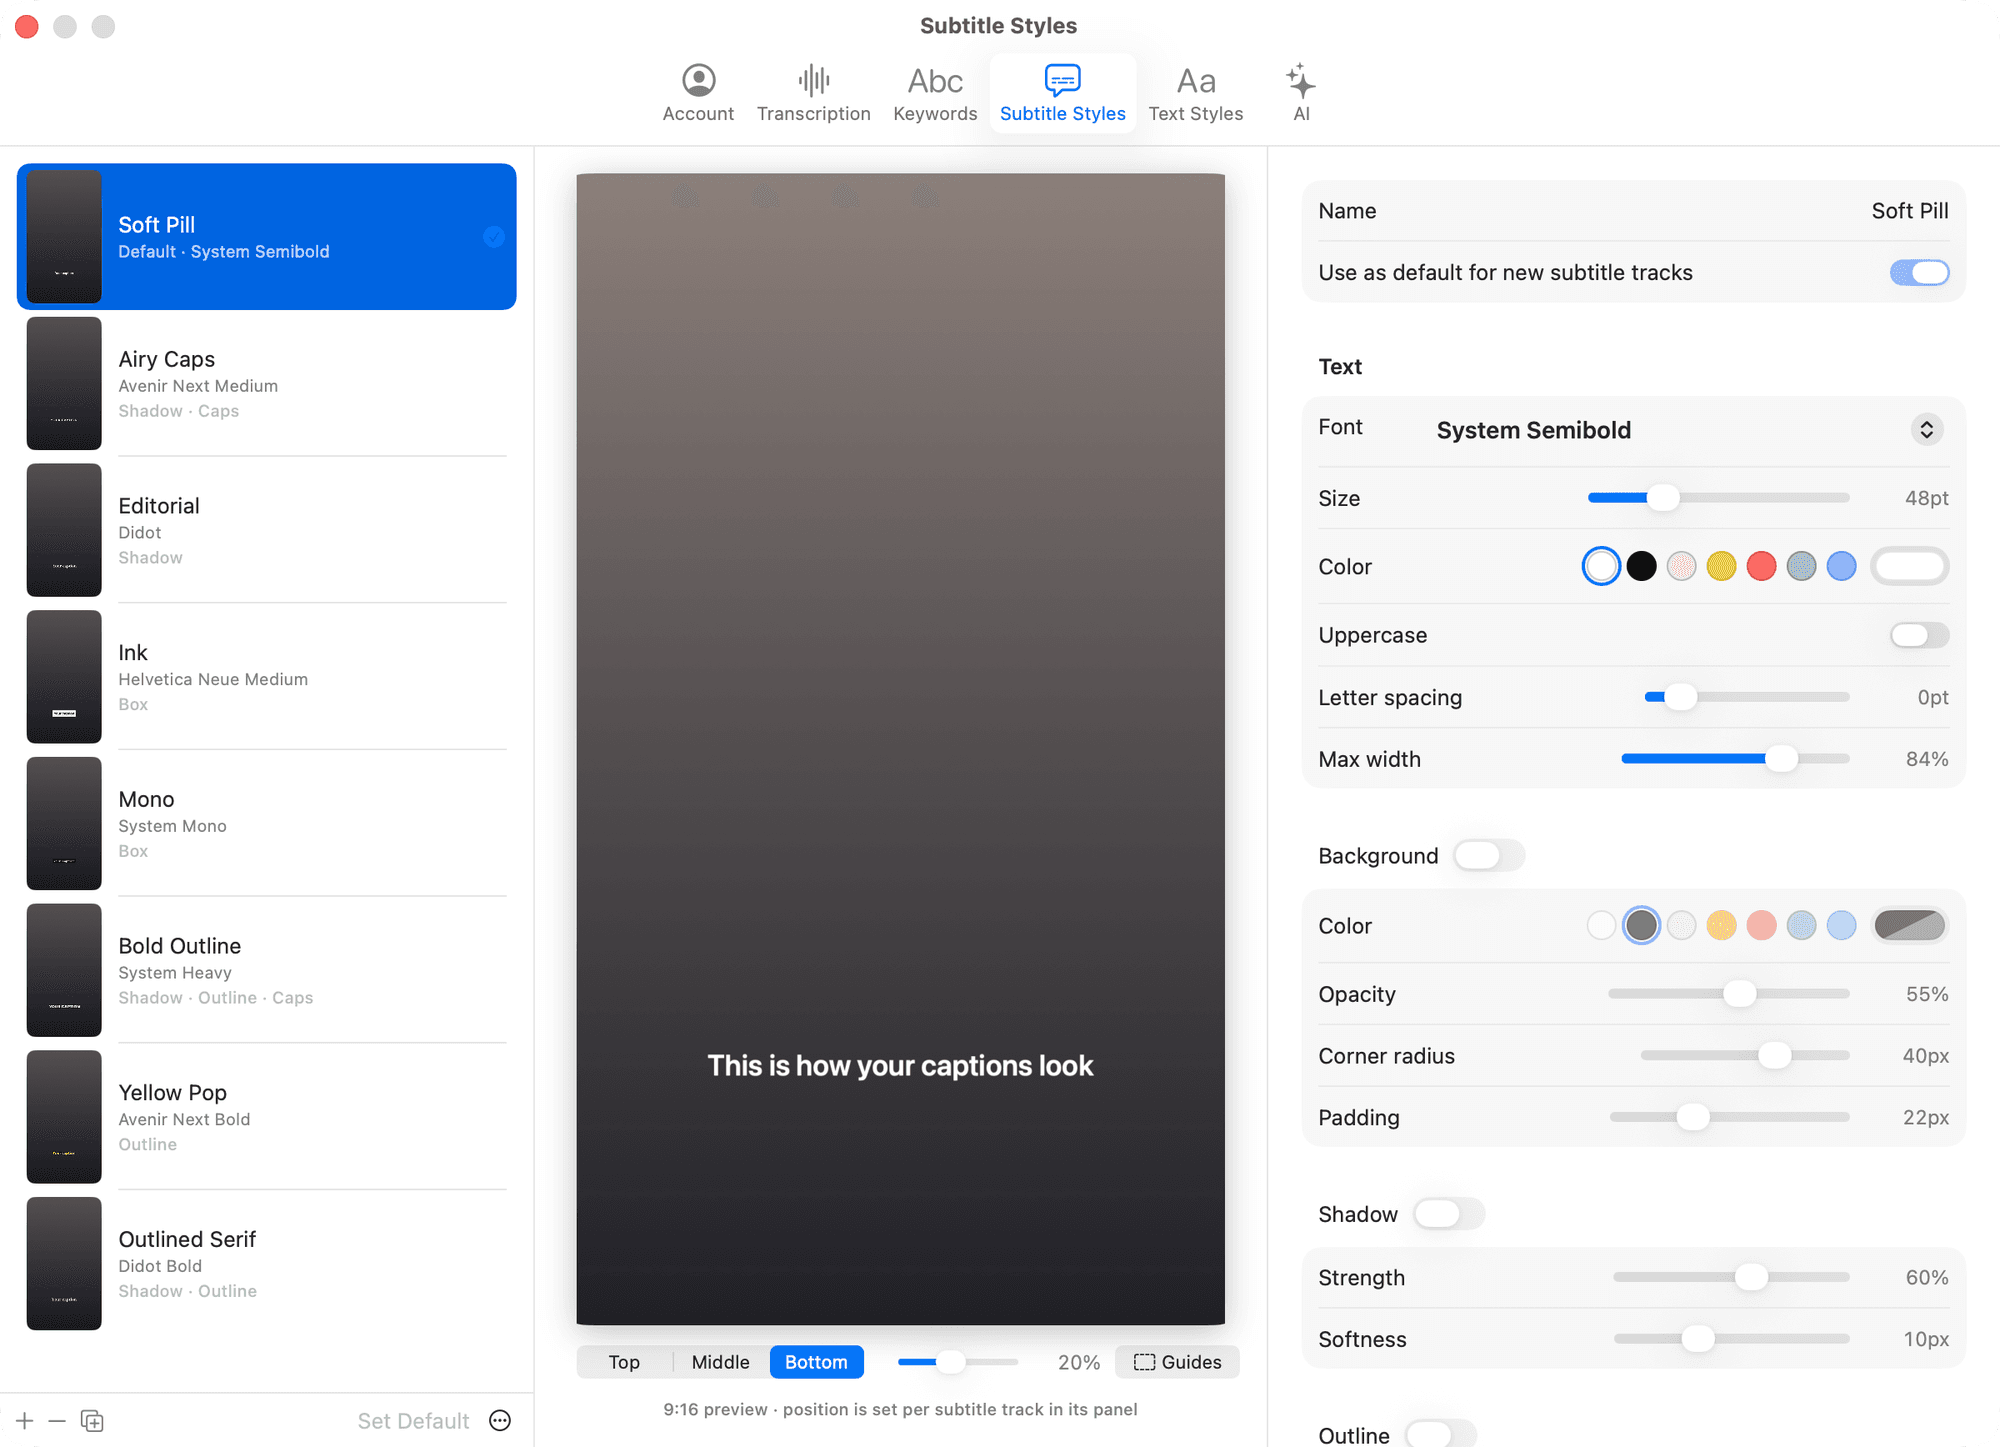
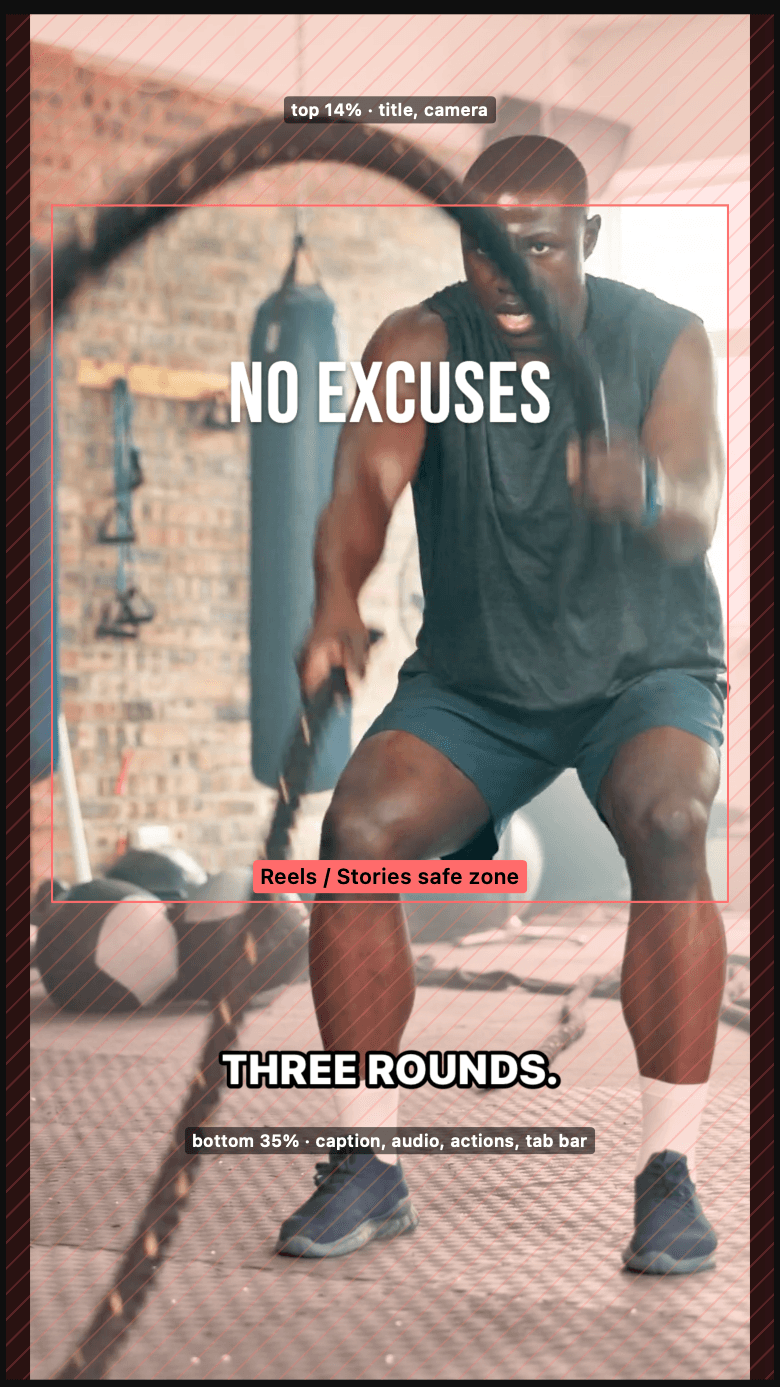
Soft Pill, Airy Caps, Editorial, Ink, Mono, Bold Outline, Yellow Pop, Outlined Serif, or your own: font, size, colours, background, outline, shadow, uppercase, word highlight. Position per track. The Reels guides shade where the app's UI will sit, so captions never hide under the caption box.
Native AVFoundation for media, AppKit and Core Animation for the timeline, SwiftUI for the chrome. Every part is there because a short video needs it.
For the long-form piece, use Final Cut. BetterLibrary feeds it the same files.
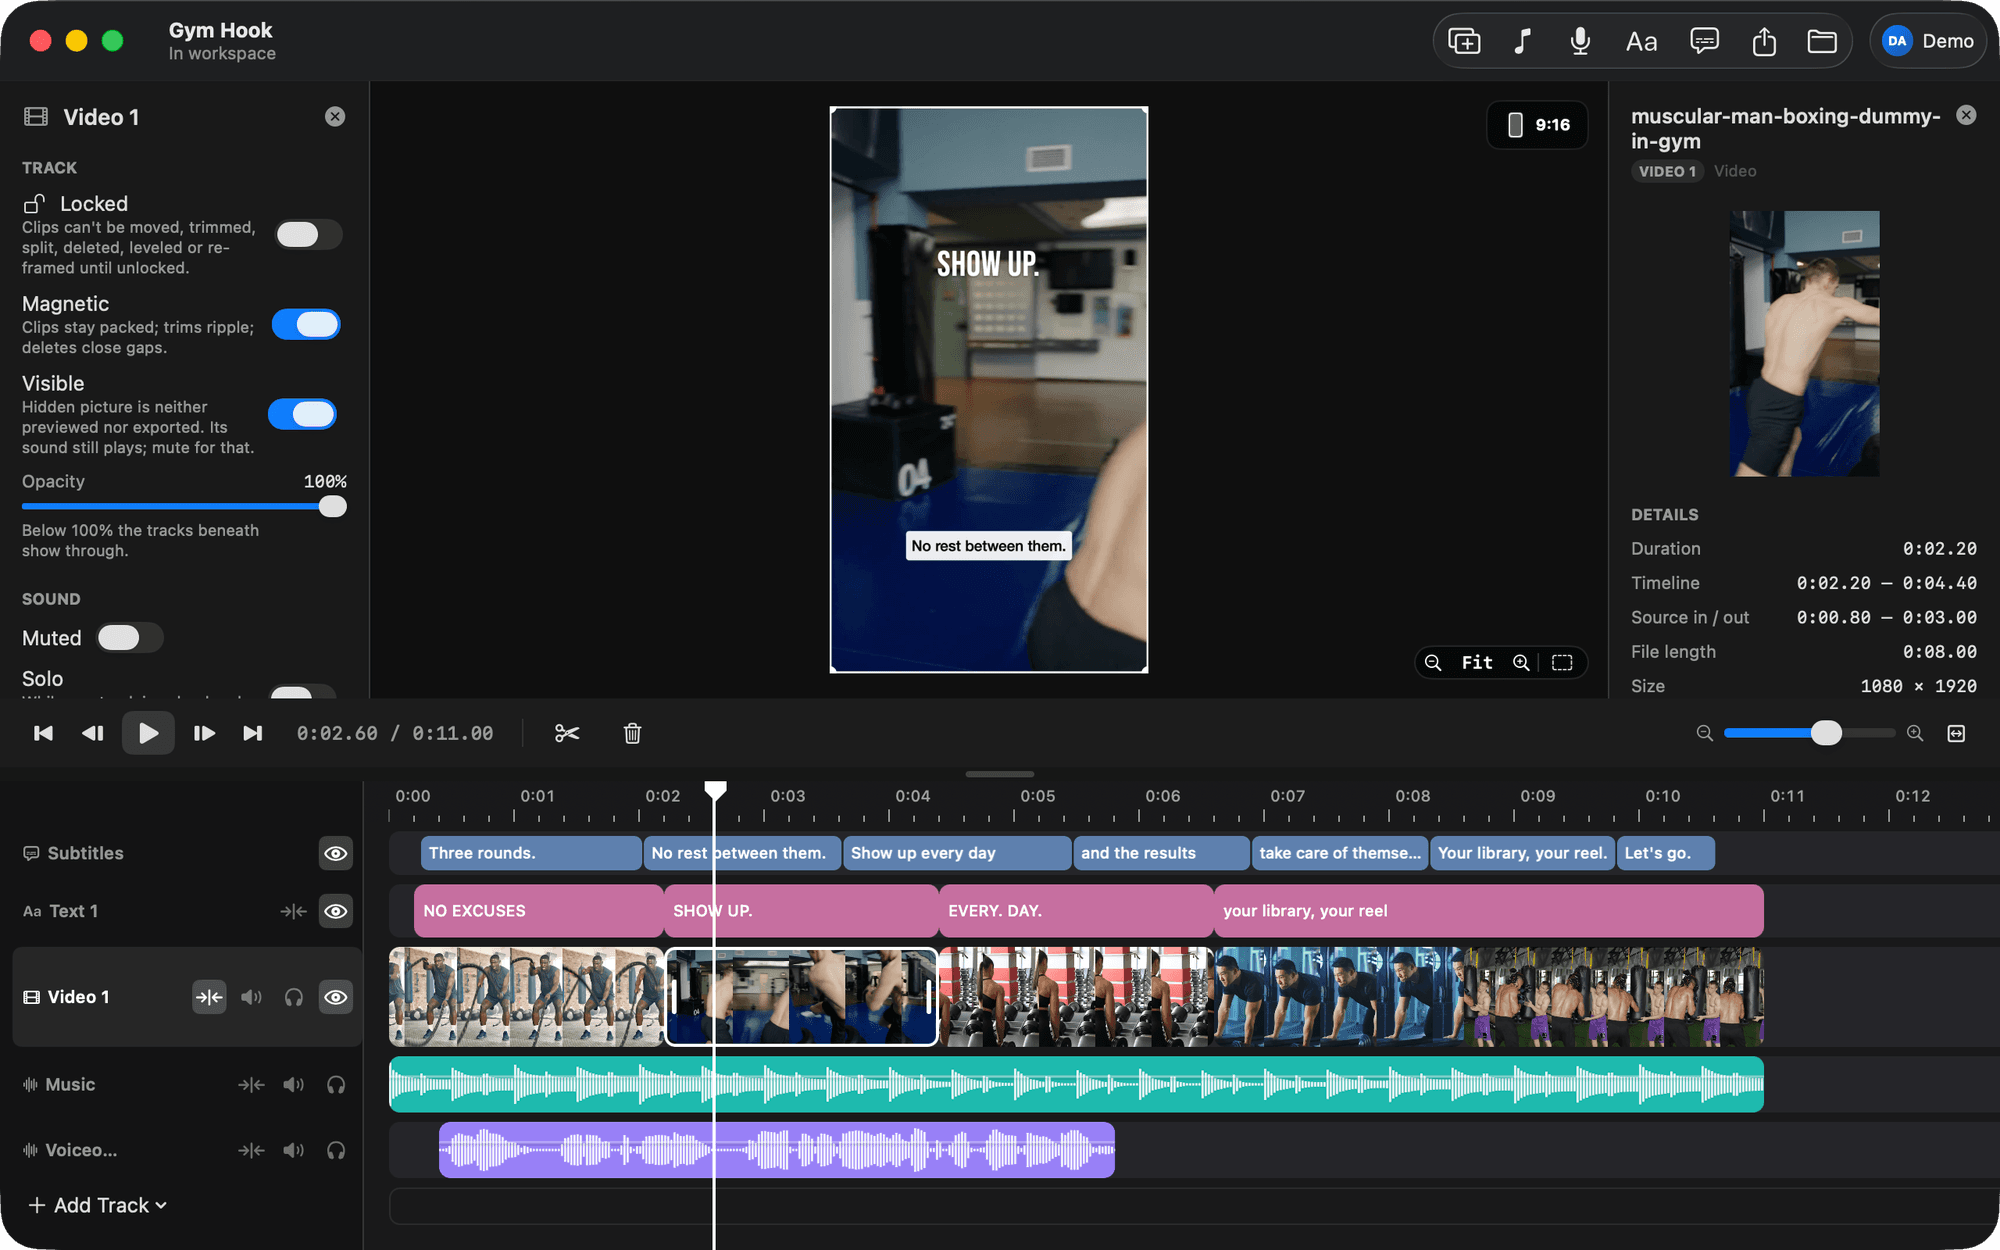
The shortcuts you know from Final Cut and Premiere, without the menus you don't. Full undo and redo for everything, including edits made by Claude Code.
 Works with BetterLibrary
Ask BetterLibrary for “the best kettlebell swing, portrait”, then drag the highlight across. It arrives as a losslessly trimmed file named after the moment and lands on the timeline, or straight into the placeholder that was waiting for it.
About BetterLibrary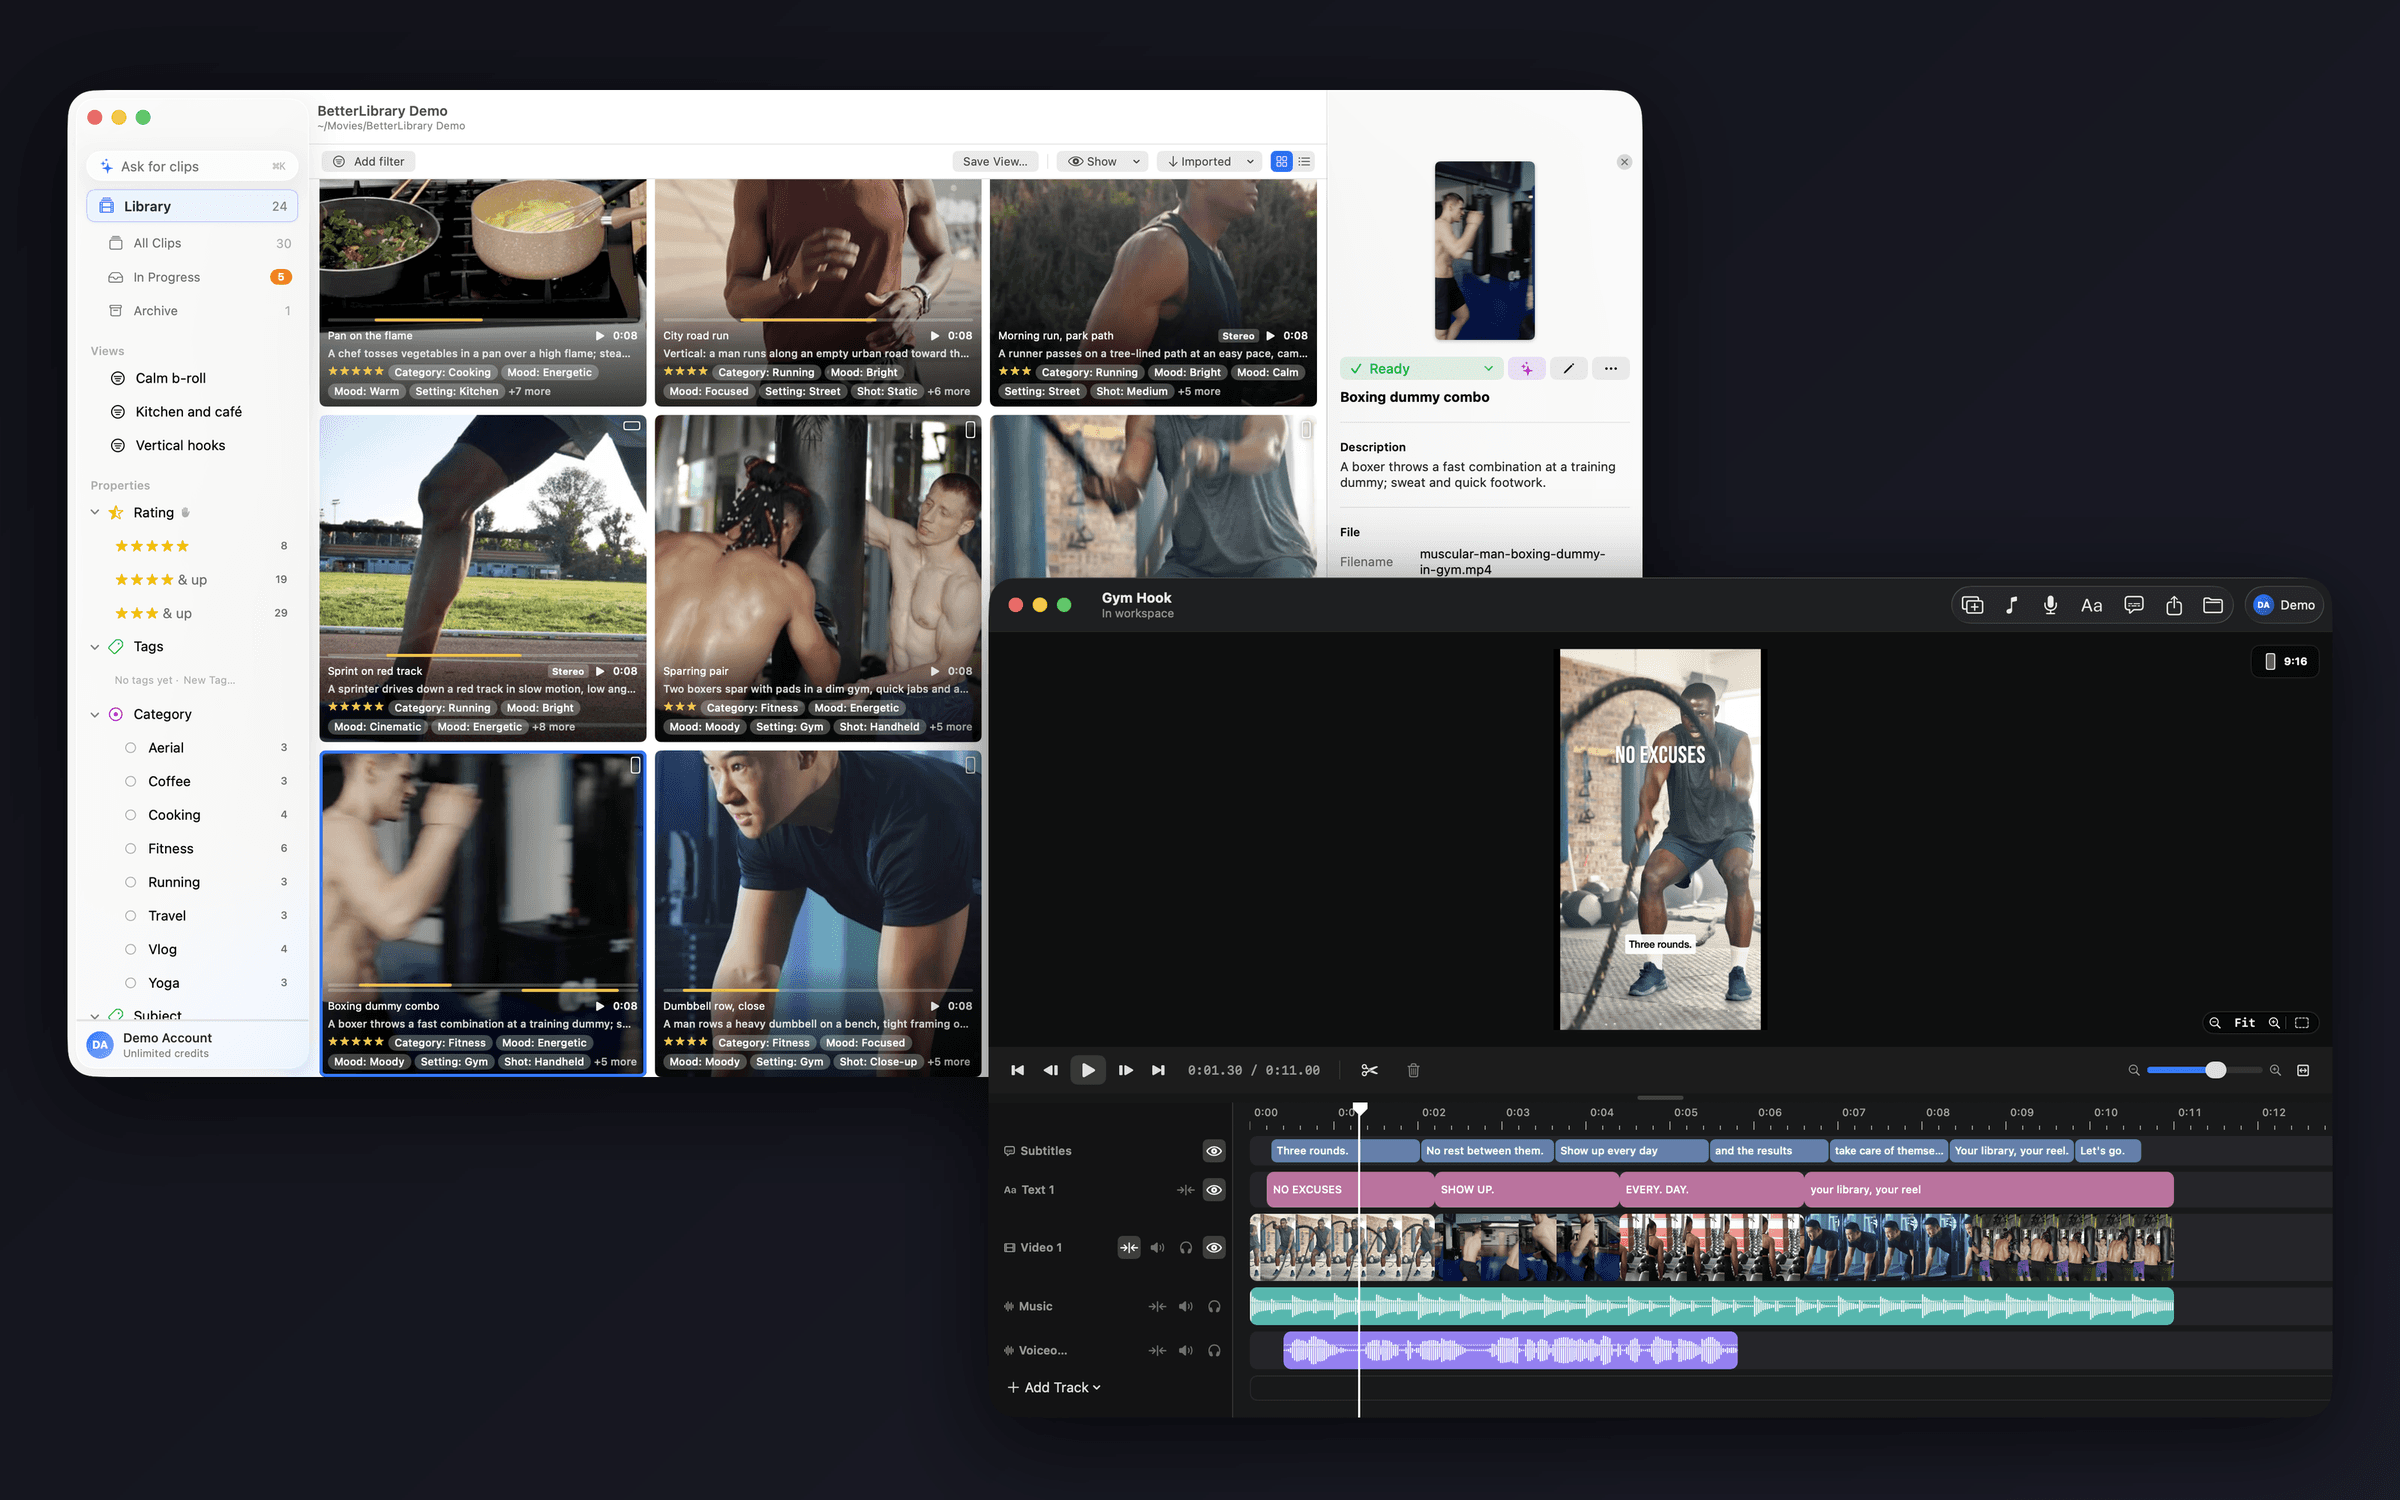
Every workspace carries a generated guide and a CLAUDE.md. Open Claude Code in the folder and it can fill placeholders, move a text, restyle the captions, cut variations and export, in the running app while you watch.
Every change lands as an ordinary undo step, and the app draws frames and contact sheets so the model can look at the cut before and after.
 BetterEditsRead the workspace guide and the open video: Gym Hook, 9:16, 11 seconds, a Text track and a Subtitles track.BetterEditsMoved NO EXCUSES to start at 0.5 s. The clip under it is unchanged.BetterEditsSwitched the Subtitles track to Bold Outline, bottom, and looked at a frame to check the title clears the caption.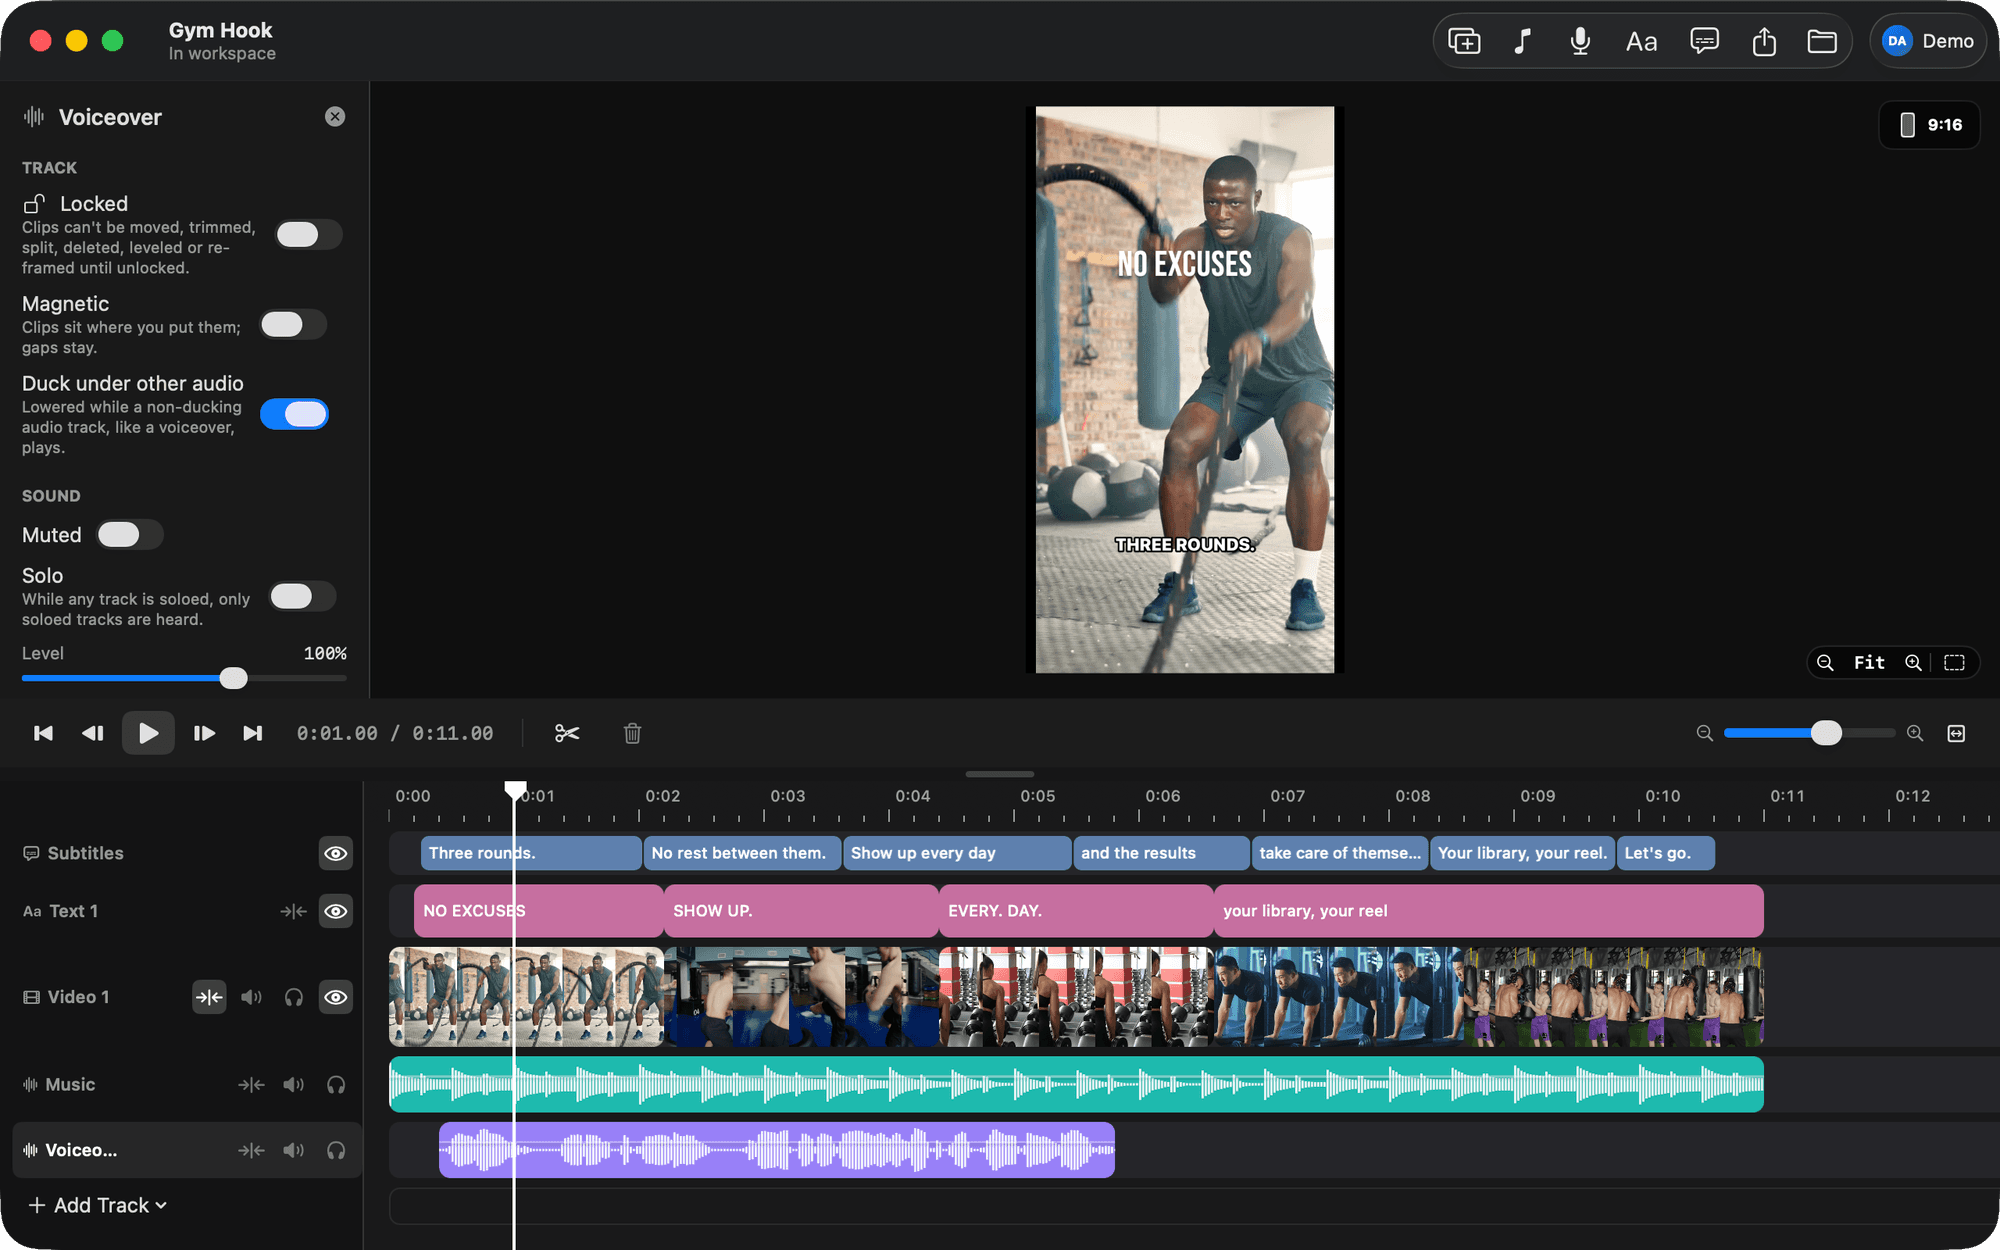
⌘R records from the playhead while the timeline plays, after a 3-2-1 count, drawing the take live. Music on the other tracks drops under the voice on its own.
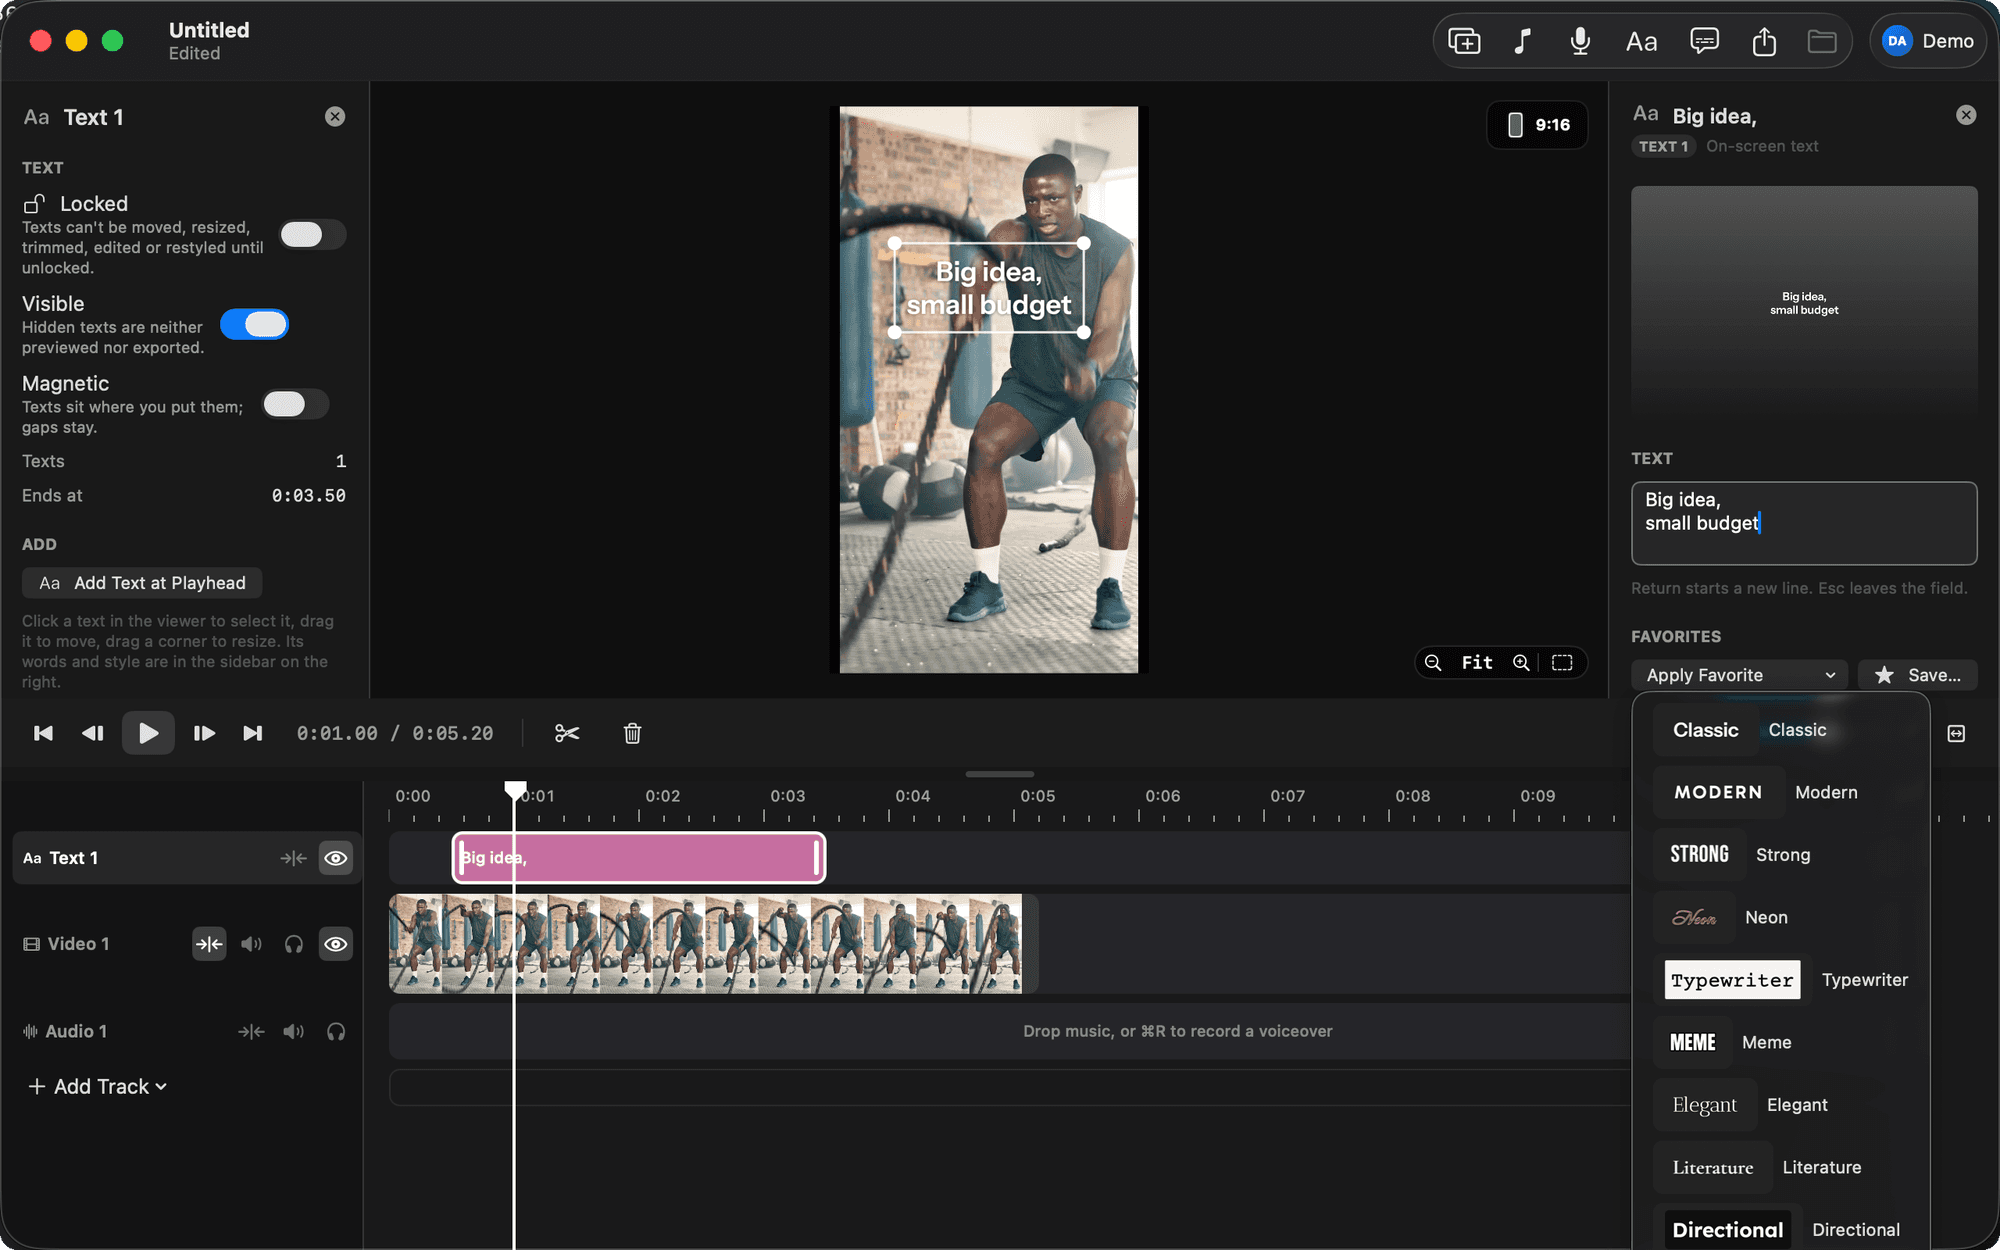
Classic, Modern, Strong, Neon, Typewriter, Meme, Elegant and more, plus every Mac font in its own typeface. Every text owns its look; favorites save the ones you like.
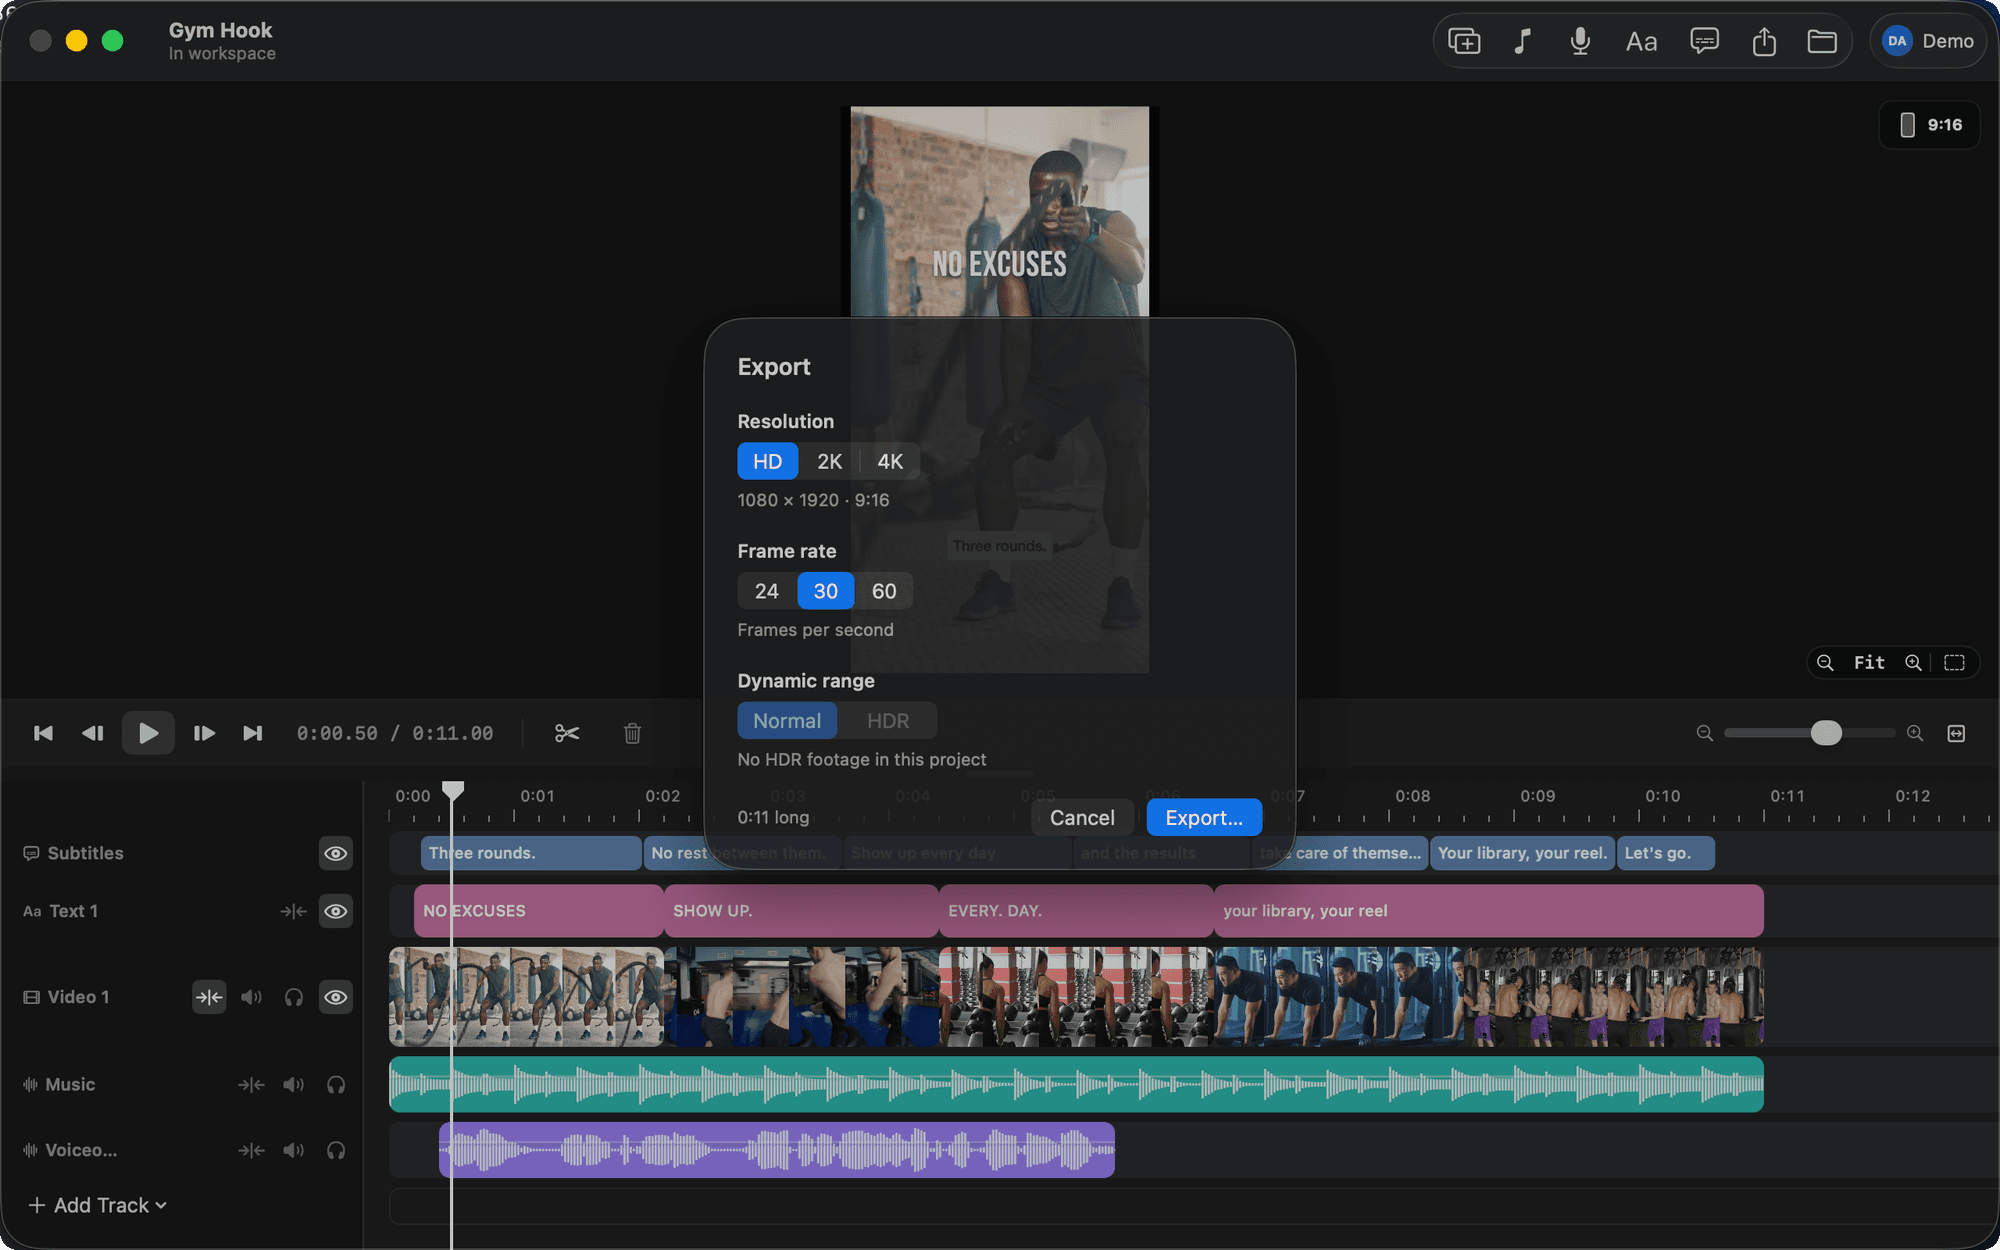
HD, 2K or 4K at 24, 30 or 60 fps. iPhone HLG footage stays HDR through the preview and the 10-bit HEVC export. What you see is what ships.
Switch 9:16, 16:9, 1:1 or 4:5 and clips, text and captions stay where they were. Reels guides shade the UI, the feed crop and the profile grid.
A project is JSON that saves itself a second after every change, next to its media. Edit it on disk and the app follows, as one undoable step.
Drag either edge of a clip and the viewer shows the exact frame. Preview renders at 1080p so 4K HDR scrubs without a spinner.
Where videos live: a folder of plain files that saves itself and never duplicates a shoot.
A library is a folder with library.json, a settings/ folder, projects/<Name>/project.json and a cache/. Create Library... asks for a name and a place; the welcome screen lists libraries opened before.
New Project asks for a name, creates the folder, and saves the project a second after each change. No dirty state, no recovery prompt, and full undo and redo.
Open, rename, duplicate, trash and reveal projects from the welcome window; each card shows its size on disk. Close forgets the library and shows the empty state, deleting nothing.
Files inside the library's media folders or the library itself are used where they are. Anything else is copied once into the project's media/ folder and stored by relative path, so a project moves as one piece.
Removing a media folder that videos still use warns first and offers to copy the files into each video's own media/ folder before the folder goes (media-folders --remove --consolidate, or --force).
Save a Copy As... writes a project as one .be file, JSON with media references. Import Project File... copies a .be into the library.
Changes to project.json or the settings JSON files on disk are picked up while the app runs. A project rewrite lands as one undoable "Edit on Disk".
The Library button in the project toolbar opens a panel with the library's location, its media folders, and the media the open video uses, copied or in place.
One timeline where footage is dropped, trimmed, split, rearranged and stood in for.
Drop video, photos or audio from Finder, or press ⌘I. Photos become 3 s clips you can stretch to 60 s.
Drag either edge of a clip; the viewer shows the exact frame at that edge while you drag. S or ⌘B splits the selected clip, else the active track, at the playhead. ⌫ deletes the selection.
Drag a clip along the track and its neighbours slide out of the way and snap into place. Drag it up or down to move it between tracks of the same kind.
N toggles snapping to clip edges and the playhead. On a free track ⌥← and ⌥→ nudge a clip by a frame, ⌥⇧← and ⌥⇧→ by a second.
⌘C and ⌘V paste at the playhead on the active track. ⌘D puts a copy right after the original and selects it; it works for clips, placeholders, texts and subtitle bars.
⇧⌘P drops a named stand-in clip at the playhead. On a video track it plays as a black plate with its name, in the viewer and in exports; on an audio track it is silent. Trim, move, split and copy it like any clip.
Replace with File..., the sidebar's Replace... button, or a file dropped on a placeholder takes the clip's spot and length. A shorter file asks whether to keep its own length or fill the rest with a placeholder.
Edit Range... (sidebar or right-click menu) slides which part of a file a clip plays without moving it. The sheet shows the whole file as a strip with a window the clip's length to drag along it.
Video, audio, text and subtitles rows, each with its own panel, lock, visibility and opacity.
On a magnetic track clips stay packed: trims ripple, deletes close gaps, dragging a clip reorders it. On a free track a clip lands at the nearest spot that fits. Text tracks can be magnetic too.
Click a track header to open its properties on the left: name, magnetic, visibility, mute, level, ducking, order and delete. The header itself keeps only magnetic, mute, solo and, on video, the eye.
A locked track refuses every edit: moves, trims, splits, deletes, drops, level and framing changes, and on a subtitles track the bars, style and position. Mute, solo and level still work.
The headphones button solos a track. The eye hides a video, subtitles or text track from the preview and the export; a hidden video track's sound still plays, and hidden tracks dim in the timeline.
Video tracks have an opacity (track panel, track-set --opacity). Below 100% the tracks beneath show through; placeholders take their track's opacity. Headers show a quiet badge when level or opacity is not 100%.
Click a header, or empty space in its row, to focus a track. S, ⌘V and Add Placeholder act there when nothing is selected. Drag the bar above the tracks to resize the area; it scrolls when tracks overflow.
Recording from the playhead, music that ducks, and sound that cuts separately from picture.
⌘R or the mic button records while the timeline plays, drawing the take live on a voiceover track. The transport shows a countdown, then the input device and a live level meter. Stop with Space.
⇧⌘M or drop an audio file on the bottom track. Drag to position, trim the edges, set the volume. A voiceover take is a clip like any other: trim, move, split, level.
Music ducks under voiceovers automatically. Ducking is a per-track switch in the track panel.
Hover a clip with sound to reveal its Final Cut style level line; drag it up or down (snaps at 100%, yellow otherwise). Clips not at 100% wear a speaker badge. Tracks have their own level from 0 to 150%.
⇧⌘D copies a video clip's sound onto a new audio track and silences the video clip, so picture and sound cut separately: a J-cut is a trim away.
Exporting a selected audio clip saves its sound alone as an M4A. A hidden video track's sound still plays; mute the track or set the clip's level to zero to silence it.
Transcribe a track, fix the bars, pick a style, and burn them in.
⌥⌘T (or Generate Subtitles... in a track's panel or context menu) mixes a video or audio track down, transcribes it, splits the transcript into short bars, and adds a Subtitles track on top.
The bars panel lists every bar for inline editing: click a time to seek, ⋯ or right-click to merge, split or delete. Clicking a bar in the timeline selects it and seeks; Esc drops the selection.
The subtitles track panel has lock, visibility, style, position (Top / Middle / Bottom plus inset), Re-split / Regenerate (which asks which track to transcribe) and arrange/delete.
Settings > Subtitle Styles edits caption styles with a live 9:16 preview: font, size, colours, background, outline, shadow, uppercase, word highlight. The style menu previews each style in its own look.
Settings > Transcription holds the language and the bar rules: max words, max seconds, break on punctuation. Keywords boosts names and jargon that would otherwise be misheard.
Transcripts are cached on disk per track content, so regenerating after a style change costs nothing.
The eye hides a subtitles track from the preview and the export. Visible bars are burned in with the same renderer the viewer uses. Lock the track once the bars are right so they keep lining up.
On-screen text with 17 Edits-style looks, edited in the sidebar and saved as favorites.
⌘T puts a text at the playhead on a Text track on top of the timeline, adding the track if there is none, and focuses its words in the clip sidebar. Double-click an existing text to type.
Click a text in the viewer to select it, drag it to move (snaps to the centre), drag a corner to resize so the whole look scales, double-click to edit its words.
Edited in the sidebar: font, size in points, colour, uppercase and spacing, background box, shadow and outline, plus X / Y and Center.
Classic, Modern, Strong, Neon, Typewriter, Meme, Elegant, Literature, Directional, Signature, Editor, Bubble, Deco, Poster, Squeeze, Journal and Rosalia: the closest Google Fonts, bundled with the app.
The Mac's fonts are there too, and the font menu lists every font rendered in its own typeface.
Saved looks, separate from subtitle styles. The Apply menu shows each favorite's name in that look; Save... stores the current one. Settings > Text Styles edits and reorders them; the default dresses new texts.
Texts trim, move, split, copy and delete like any clip and text tracks can be magnetic. The eye hides a text track from preview and export; exports burn texts in. Text never lengthens the piece.
Paste a reel's link and get a project with the same structure, as editable JSON.
⇧⌘N takes a reel's link and builds a project with its structure. The reel is fetched at its best resolution with yt-dlp (H.264 from VP9); a 720p copy goes to the analysis, the full one stays as the reference.
Our AI reports every shot, on-screen text and sound with timings. The analysis is kept as reel.json in the project folder.
Our AI turns the analysis into named placeholders ("Talking head: hook line"), music and voiceover placeholders, and texts in a matching favorite.
Text the drafting model adds on its own is dropped, and burnt-in captions are noted rather than copied. Without a gateway key the analysis is mapped to a template directly.
The original rides on a "Reference" video track at the top at 50% opacity and 50% level, over the placeholders. When nobody speaks, its sound goes to reference-audio.m4a on the audio track as music.
Keys and models live in Settings > AI and this Mac's defaults, or GEMINI_API_KEY and AI_GATEWAY_API_KEY in the environment. Public posts need no login; yt-dlp can read a browser's cookies for the rest.
A template describes a video without footage: video and audio segments with name, start, duration and notes; texts with words, timing, favorite, position and look; plus name and notes.
Import Template... starts a project from one: segments become named placeholders in order, texts become text clips. Claude Code can print the open project as a template, or add one to it, from the workspace folder.
Four canvases, on-canvas framing, and an export sheet that follows the footage.
9:16 by default. The pill in the viewer's top-right corner opens into 9:16, 16:9, 1:1 and 4:5 with miniatures and asks before changing. A cloned landscape reel makes a landscape project.
Positions and scales are normalized, so switching the canvas keeps clips, text and captions where they were. Exports follow the canvas, grown to the footage's size.
Drag the selected video clip in the viewer to move it, pinch or scroll to scale, drag the corner handles, or use Crop mode's edge handles.
The Guides menu on the viewer shades the Reels UI and the feed/grid crop zones, so text and captions land where the app won't cover them.
⌘E opens options like the Edits share sheet: HD / 2K / 4K, 24 / 30 / 60 fps, Normal / HDR. HDR is offered only when the footage is HDR; Normal tone-maps to Rec. 709. Defaults follow the footage.
iPhone HLG footage stays HDR through the preview and the HEVC 10-bit export; otherwise exports are H.264/AAC MP4. The preview renders at 1080p; the export at the footage's size, up to 4K.
Exports burn the visible subtitles and texts in with the same renderer the viewer uses. Hidden tracks are left out. Files land in the project's exports/ folder.
⇧⌘E or the button in the clip sidebar exports just the selected clip: a video clip renders its stretch of the timeline with everything on it.
A guide written into every workspace, so Claude Code can cut the piece for you, one undo step at a time.
The app writes BetterEdits.md into every workspace and refreshes it on every launch: how tracks, clips, text and captions behave, and everything Claude Code can do there. CLAUDE.md is yours and imports the guide.
Open the workspace folder in Claude Code and say what you want cut. The agent reads the guide and works the project: add, trim, split and move clips, put text on screen, generate and style captions, export.
Whatever the agent does lands in the app exactly like a change you made by hand. You see it in the timeline as it happens, and ⌘Z takes it back.
It cannot watch video, so it draws itself a frame or a contact sheet, a grid of labelled frames with text and captions drawn on, then reads the picture before deciding what to change next.
The guide writes a permission rule into .claude/settings.json so Claude Code can work the app without asking each time, and nothing beyond it. Other rules in the file are kept.
There are no API keys on this Mac. Claude Code needs the same active trial or subscription as the app, and transcription and cloning spend credits from your plan exactly as they would from the window.
The agent can move the playhead and select a clip to show you what it means, and the detail in what it reads back is what it sees, so naming tracks and placeholders helps you follow along too.
Claude Code is what we build for and test with, but any agent that reads a CLAUDE.md-style guide works the same way.
Every key the editor listens to, so your hands stay on the keys.
Space plays and pauses. ← and → step a frame, ⇧← and ⇧→ a second, Home and End jump to the start and end. Click or drag in the ruler or empty track space to scrub.
S or ⌘B split, ⌫ deletes, ⌘C / ⌘V / ⌘D copy, paste and duplicate, ⌥← ⌥→ nudge, N toggles snapping, ⌥⌘L locks the active track, ⌘Z / ⇧⌘Z undo and redo.
⌘R records a voiceover, ⇧⌘M adds music, ⌘T adds text, ⌥⌘T generates subtitles, ⇧⌘D detaches audio, ⇧⌘P adds a placeholder.
Pinch or ⌘-scroll to zoom, ⌥⌘= and ⌥⌘- step it, ⌥⌘0 or the Fit pill resets. Two-finger scroll pans.
Pinch, ⌘-scroll or ⌘= / ⌘- zoom the timeline; ⇧Z fits the whole piece. Two-finger scroll pans it.
⌘N new project, ⇧⌘N clone reel, ⌘O open, ⌘S save, ⌘W close project, ⌘E export, ⇧⌘E export the selected clip, ⌘, settings. Esc deselects the clip, then closes the track panel.
The subscription pays for the parts that cost us money to run: transcription, reel clones and the 4K HDR path.

The editor. Cut, caption, export.
Each app is its own subscription with its own credits and its own 7-day trial. Use one, or both.